General
Created with the Personal Edition of HelpNDoc: Free Kindle producer
Login Procedure
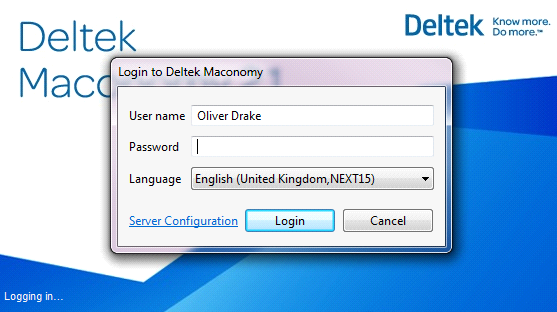
Start up Maconomy via the Icon in the Dock, using the icon on your desktop or from your Windows Start menu

The Login screen will open (if not, follow the steps here). Please enter your username and password as provided by your system administrator or manager. Initially your password is set to 123456.
Select the Login button to log on.
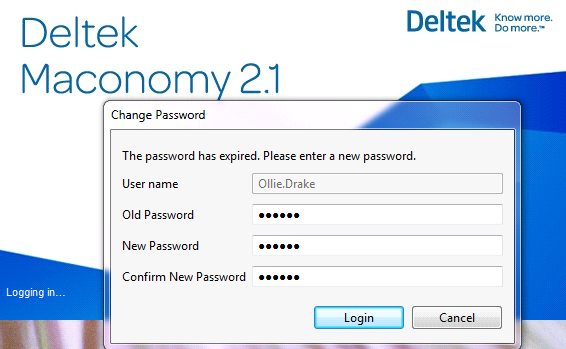
When logging on for the first time you will be asked to change your password. First enter your password initially provided by the system administrator. (123456)
In the next box enter a new personalized password which must consist of at least 6 letters or digits or combination of both.
Confirm this new password in the last box. Select the Login button to continue.
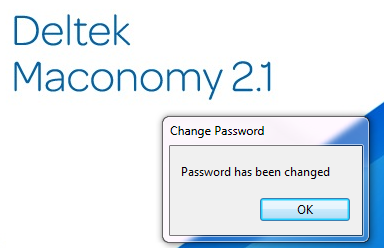
Maconomy will inform you the password has been changed successfully. Press the OK button to continue
You are now successfully logged on to Maconomy. Your default Workspace will open and the To Do's will be refreshed.
When you find difficulties logging on, please contact your System Administrator for any assistance.
Created with the Personal Edition of HelpNDoc: What is a Help Authoring tool?
Connection Information
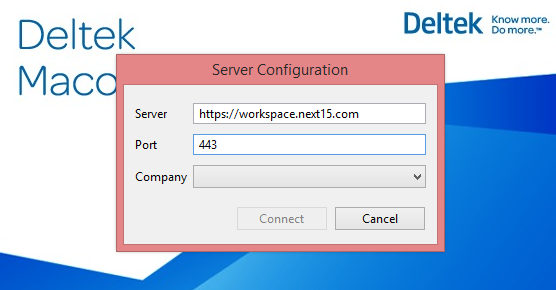
If you first open Maconomy and your are asked to enter the Server Configuration information, please enter the following
Server: https://workspace.next15.com
Port : 443
Press Connect. This will fill in the Company information and then press Connect again.
You will then be taken to the Login screen
Created with the Personal Edition of HelpNDoc: Produce online help for Qt applications
Maconomy Screen layout, General Navigation
Created with the Personal Edition of HelpNDoc: Easily create Help documents
Menu and To-Dos
The Workspace can be opened from the Menu or for the To-Dos in the left part of your screen.
In the Menu workspaces are grouped into Workspace groups, such as Projects, Time & Expenses and Reporting. Only one group at a time is opened to show the different workspaces. A Workspace can be opened by double clicking on the Icon or the name of the workspace. The same workspace can be opened several times so you can work on different projects simultaneously.
You can close the Menu and the To-Dos by clicking on the icon in the top left or using the minus icon (see picture). This way you can use the whole screen for the Workspace. By Clicking on the Menu icon again, the menu and To-Dos will show up on your screen again.
To-Dos
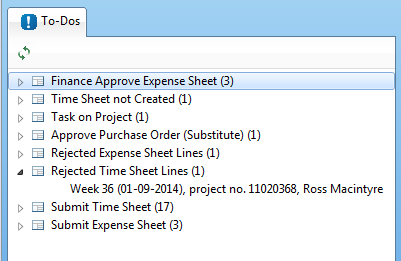
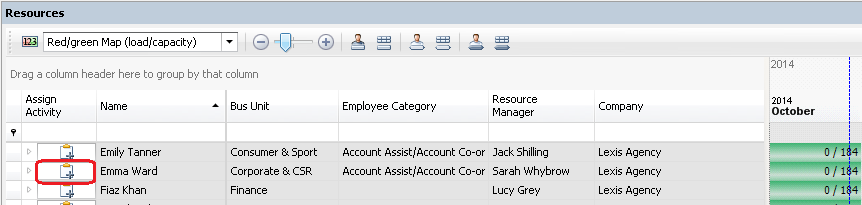
In the left lower corner the To-Dos are displayed. To-Dos are notifications to alert users when certain events occur. The user receiving the To-Do should take action on these To-Dos so the process will continue. Examples of To-Dos are Approve Time as Project Manager, Submit Time Sheet and Rejected Time Sheet Lines.
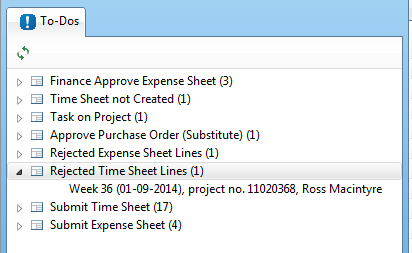
Behind the name of the To-Do the amount of notifications is shown. When clicking on the arrow on the left of the To-Do (see red arrow in picture above), a summary of each To-Do is shown.
Double clicking on the To-Do (in the example above click on the text ‘Rejected Time Sheet Lines’) will open the workspace for correcting rejected Time, which looks similar to the timesheet workspace. Here all Rejected time sheet lines will be shown which can then be approved individually.
Created with the Personal Edition of HelpNDoc: Easily create Help documents
Workspaces
A workspace is a grouping of panels, organized in a hierarchy around a business entity or process. This can be a customer, a role or a project manager or it can be processed like financial reporting. The workspace is a work area where all the tool and functionality that are needed for working with the customer, being a project manager, or an employee entering time and expenses, are present. The workspace gives you all the tools and functionalities that you need, organized neatly into a logical and easy to use interface.
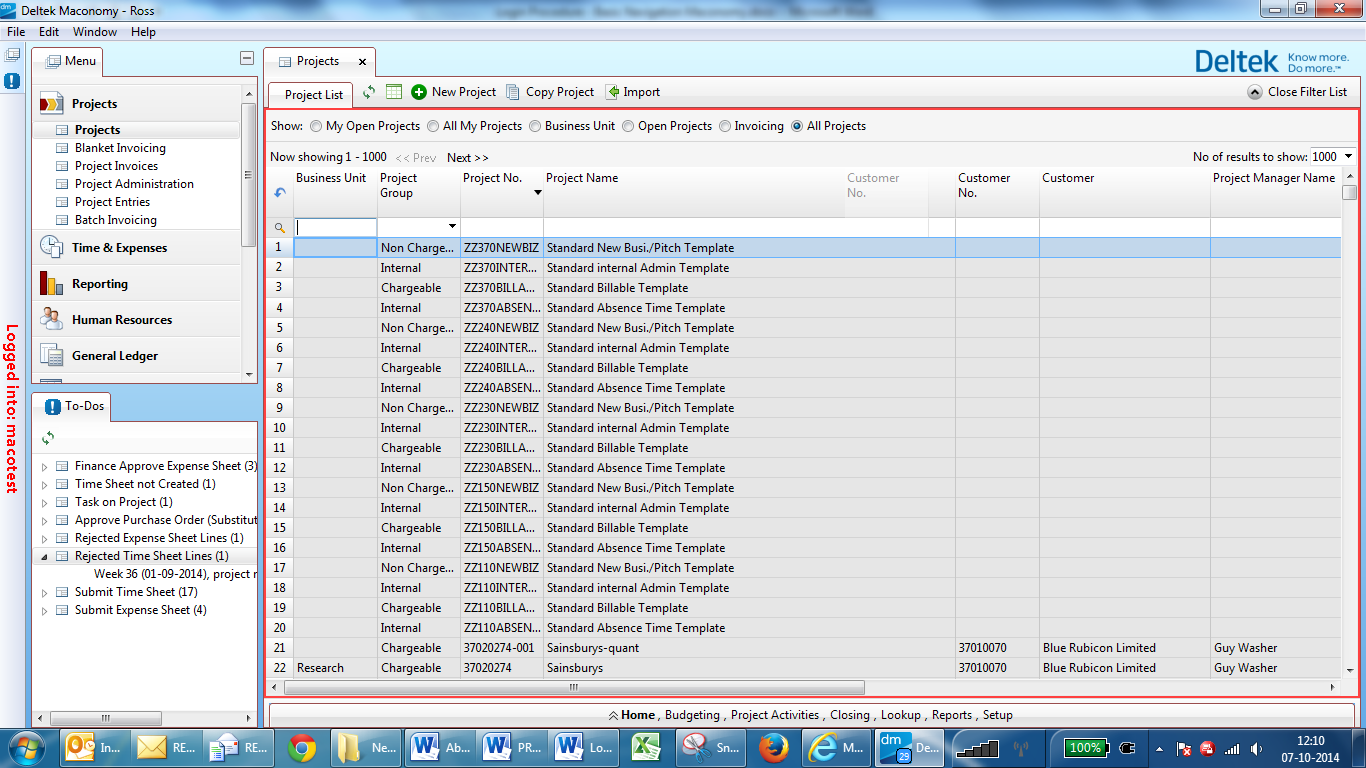
You Open a Workspace by choosing a Workspace group, eg. Time & Expenses, and then choosing one of the workspaces. Open the Workspace Projects.
The workspace is divided into several Sections. A large workspace is divided into sections. They are created to include all the steps in the workflow.
The third level consist of tabs. Each section has its own set of tabs. Once you have selected a tab, a range of various panes will appear. A pane can consist of a new set of tabs. On the right Assistance are available, depending on the workspace you are in. Within the assistant the data can be shown via Tabs.
When in a workspace the data can be presented in detail (in this case one project) ….
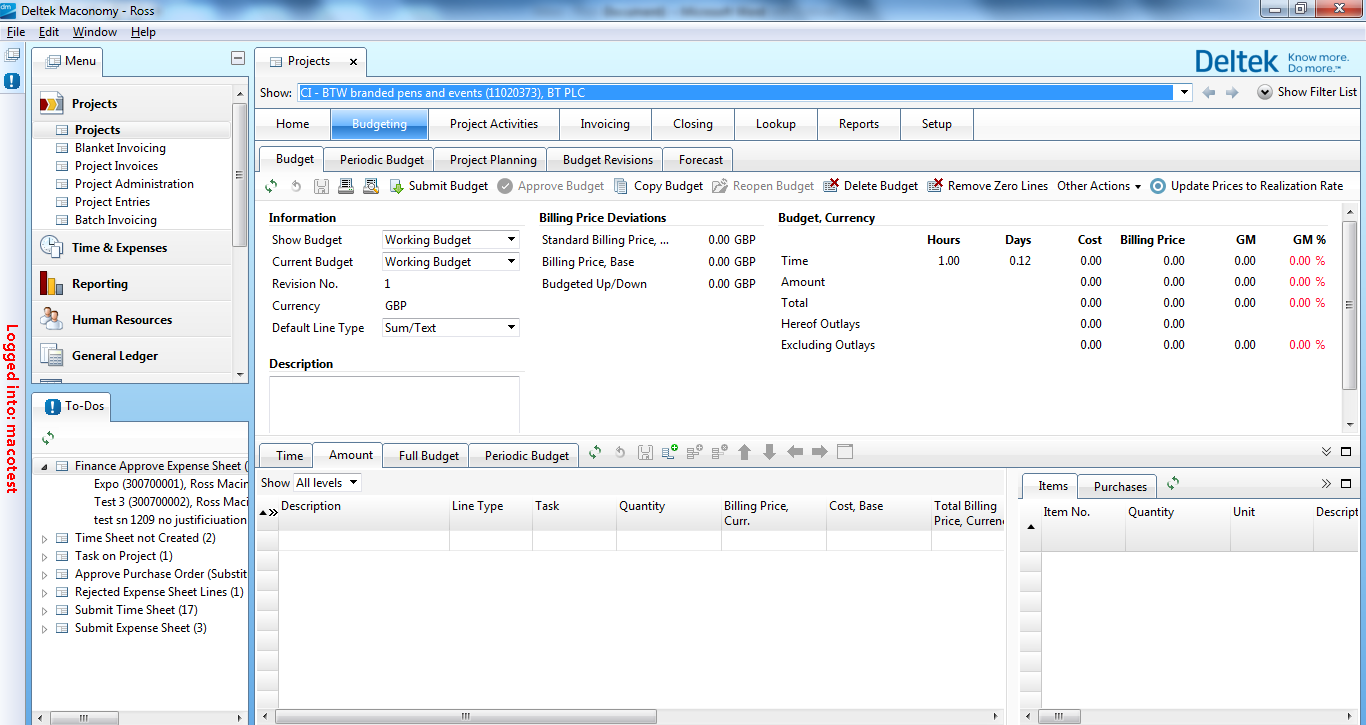
… or as an overview with all projects.
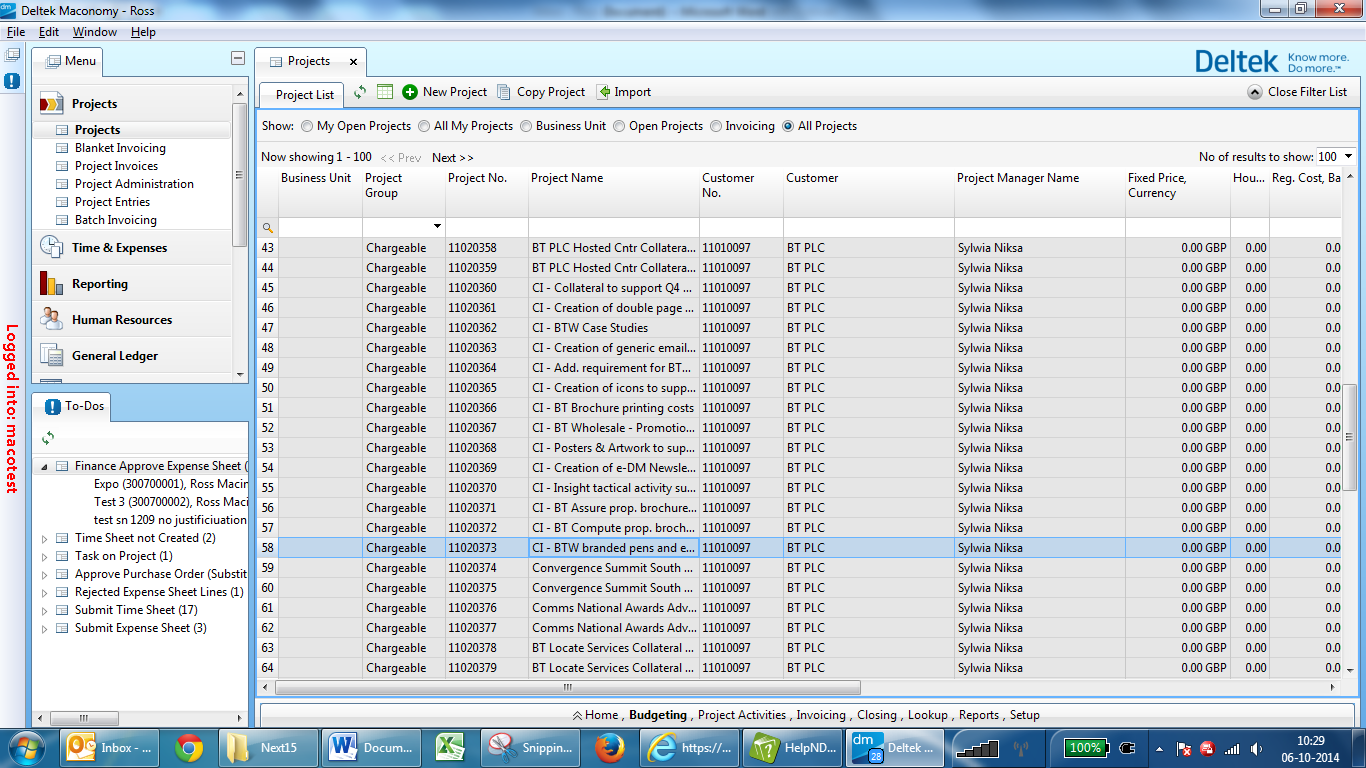
You can switch between those views by using the button on the right top corner.
Created with the Personal Edition of HelpNDoc: Free iPhone documentation generator
Searching functionality
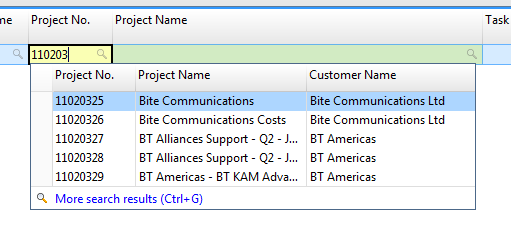
When you are looking for a project in Maconomy you can simply type the name or a part of the name in the white field underneath the column name. Maconomy will filter as you type. You can enter some extra search criteria in any other field at the same search action.

When the right project is found, simply double click on the project and the Project details will be shown.
In fields where you need to enter data, such as searching for a task in the budget, you can also use the <Ctrl> + <G> combination. Then a separate search window pops up where you can specify more details on the item you are searching for. In this example you can now search on more task details.
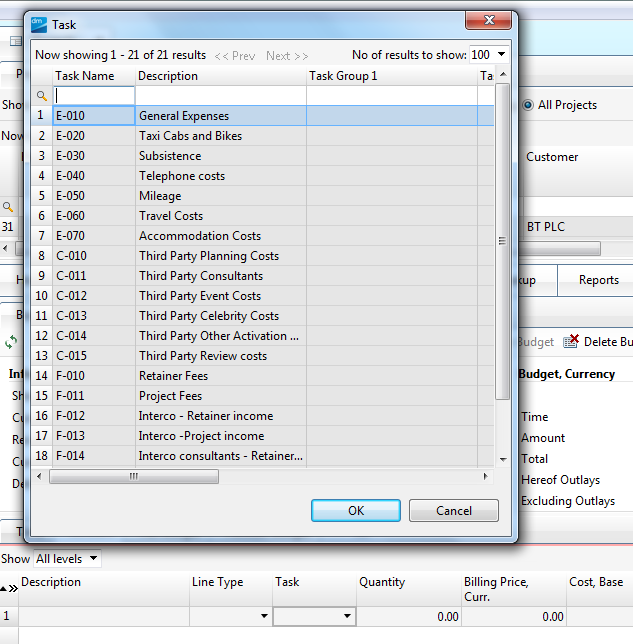
When working with an Apple Macbook the <Ctrl> + <G> functionality is not available. Users can then, after typing in a search criteria, click on the blue text ‘More search results (Ctrl+G)’ or click on the magnifying symbol in the right top corner. This will open the search window as well.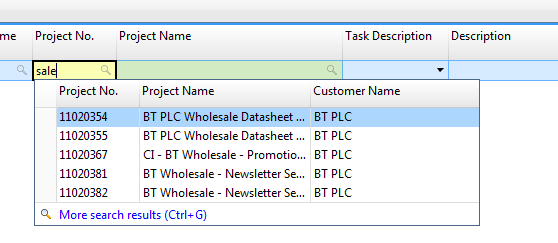
Search results are by default presented in a batch of 25. This means that when you search for a project from a customer, the first 25 projects matching the search criteria will be shown.

This is to speed up the search process and to maximize the performance. Via the Next >> button you can move to the next 25 projects.
You can also set No. of results to show to a higher number using the dropdown. In the preferences window (see subject further on in this document) you can set the default number of search results to show. This a user specific setting.
Created with the Personal Edition of HelpNDoc: Qt Help documentation made easy
Export to Excel
In many windows in Maconomy the data you see can be exported to MS Excel. This can be done easily by pressing the ‘To Excel’- button.
See below an example on how this works in the Project Workspace.
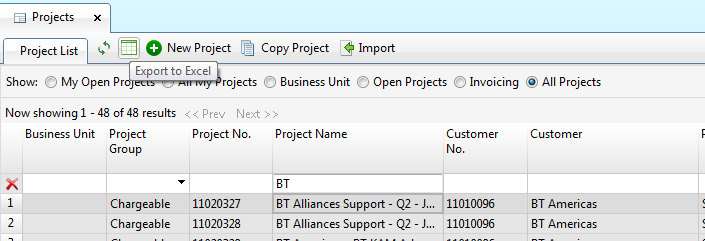
By pressing on the Export to Excel button the selection shown on your screen will be exported to Excel. When you have clicked on this button MS Excel will automatically open and the data is presented in the first tab.
Created with the Personal Edition of HelpNDoc: News and information about help authoring tools and software
Printing Functionality
Printing Functionality
When you have entered your expenses in Maconomy, you will need to print the expense sheet and attach the receipts to it. Printing expense sheets can be done using the Print button. These buttons are also available in, for example, the purchase order workspace or the project invoicing tab.
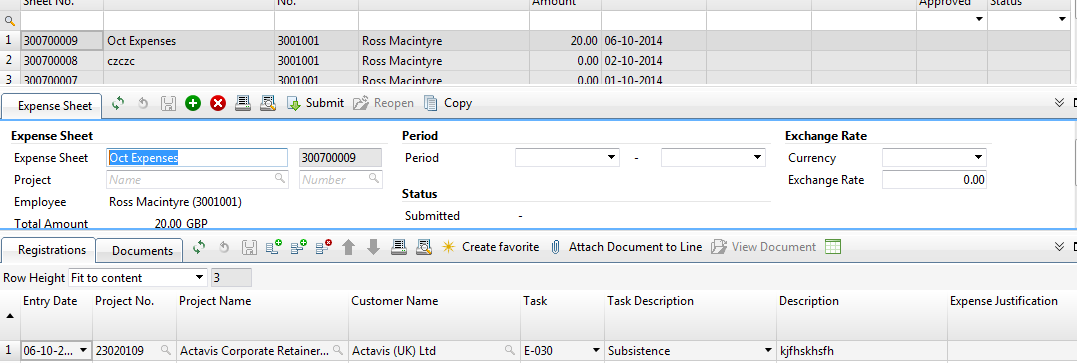
In this example there are 2 buttons.  Using the left printer will print the current expense sheet, using the right icon will show a popup window where a selection criteria can be entered. This way multiple expense sheets can be printed.
In the example above the first line with expense sheet number 300700009 is selected. When I press the left print button  this expense sheet is printed to a PDF file. From there you can physically print the expense sheet.
Using the right print button  will show you a popup window where a selection criteria of expense sheets can be entered.
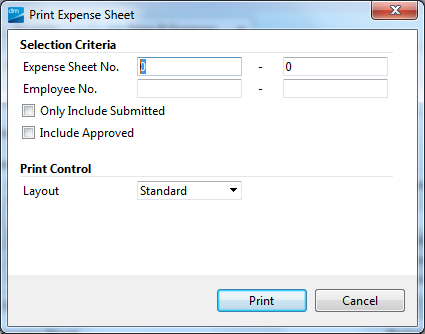
All prints are first printed to PDF. From there a printer can be selected to create the copy.
Created with the Personal Edition of HelpNDoc: Create help files for the Qt Help Framework
Customizing Your Maconomy
Every user has the ability to set several setting to their comfort. The user can preset some preferences on how to work with the system and the user can customize the screens by changing, removing, replacing columns in the workspaces. Please note that these settings are all user specific.
Preferences
Via the general menu Edit, Preferences,
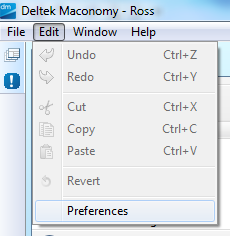
a window is opened where you can specify your own settings:
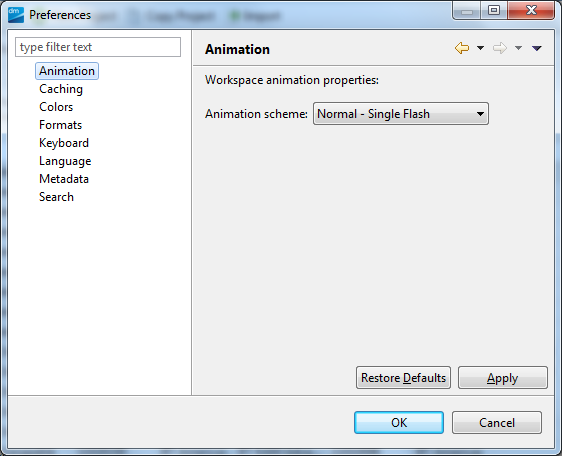
All settings are grouped into different menuitems. They are available on the left. On the right there is a button that resets all settings to default. All user specific settings will then be lost. Resetting is done per menu item.
The practical, most used settings will be explained here.
Colors:
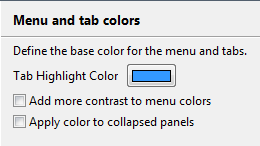
- This setting will highlight the space you are working on by showing a lining around the space in the colour specified here.
- Add more contrast to menu colors will sharpen out the space you are working on.
- This will highlight the assistance windows (collapsed on the right).
Formats:

- When ticked, this setting will use the default formats as specified on your computer. When you untick this box the settings can be specified
- Date format can be entered here. d=Day, M=Month, y=Year. Please note: using a lowercase ‘m’ in the date format will show the minutes instead of the month.
- Time format can be specified here. Capital H for 24-hours, lowercase h for 12 hours. Double HH shows 9 o’clock as 09:00
- Decimal symbol. Either a dot or a comma.
- 1000 separator. When the decimal symbol is set as dot, the 1000 separator must be set as comma. As a 1000 separator the ‘ can also be used
- The number of decimals to be shown in all fields in Maconomy (including Print-outs). This setting only applies to Quantity fields. Fields with prices will always have 2 decimals. This setting comes in use when specifying the exchange rate for foreign currencies.
- When entering time, you can use minutes instead of the metric system.
- Place the currency sign in front ($ 100.00) of the amount of behind it (100.00 $).
Search
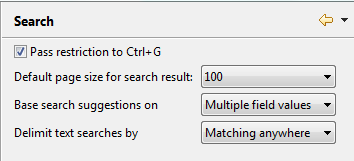
- When this box is ticked your primary search criteria is entered in the search field when you open the search box via <Ctrl>+<G>.
- Here you can specify the number of search results to be shown. Default this is set to 25. Maximum is 1000.
- When this field is set to ‘Multiple field values’ and you enter a search item in the field Project name, Maconomy will, for example, also search in the customer name field. This helps you find data faster.
When setting this to the value ‘Single field values’, Maconomy will only search in the specified field.
- This setting will use the search criteria and will use that to match prefixes or to match anywhere.
Matching prefixes:
When enter in the project name ‘Company’, only projects with the name starting with ‘Company’ will be shown.
Matching anywhere:
When enter in the project name ‘Company’, all projects with somewhere in the name ‘Company’ will be shown.
Column settings
In Maconomy all users can specify the width and order of the columns. It is also possible to specify which columns you want to show and which columns can be hidden. Go to a workspace and right-click on the column header.
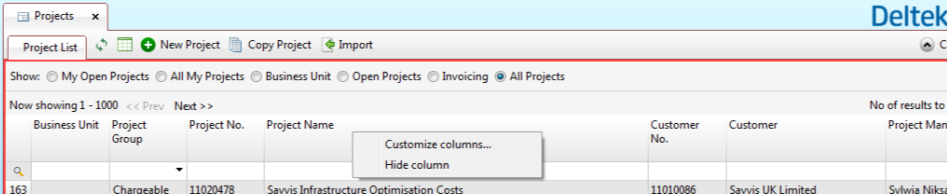
Choose Customize columns…
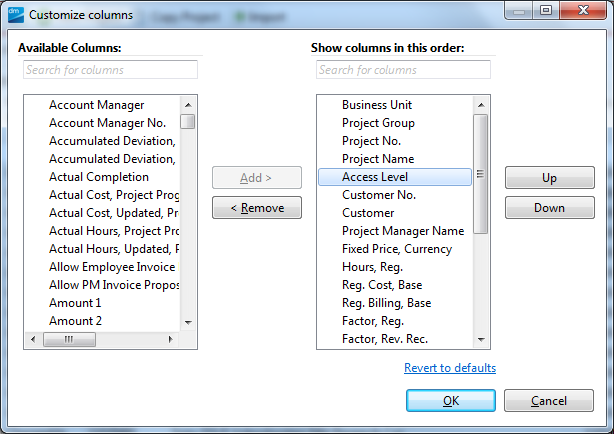
A new window pops up where you can specify which columns you want to show.
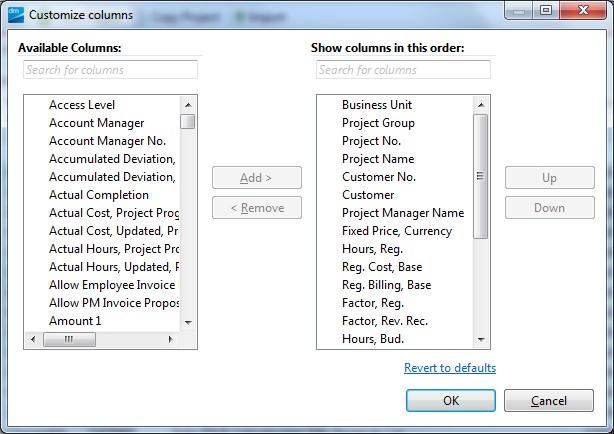
On the left all available columns are listed, on the right the currently selected columns are listed.
In the top you can type in the name of the column to search for a specific column. When you have found the desired column you can drag this column to the right in the position you want that column to be. When you pick up the column Access Level , drag it to the right and place it on the column Customer No., The column Access Level will be placed above (and this on the left of) Customer No. You can also double click or use the ‘Add’ button. This will place the selected column on the bottom of the list and thus on the right of your screen. Using the ‘Up’ and ‘Down’ buttons you can move the columns more to the front (Up) or to the back (Down).
Sorting & Columns
Data can be sorted by clicking on the column you want to sort on. The Arrow will show whether the sort is ascending ![]() or descending
or descending  . In this example projects are sorted on the project number, ascending. By clicking one more time on the column Project No., the column will be sorted descending.
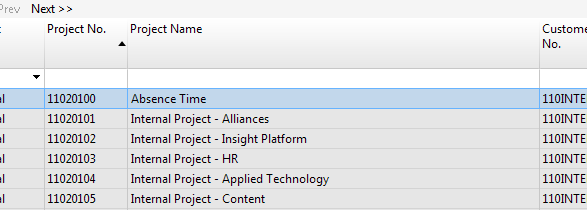
You can adjust the order of the columns by simply drag and drop the header of the column to the requested position. In this example the column Customer No. is moved to the left.
When you would like to hide a column, simply right click on the header bar and choose ‘Hide column’ The selected column is removed but can be placed back using the ‘Customize columns...’ option.
Created with the Personal Edition of HelpNDoc: Create help files for the Qt Help Framework
Time Sheets
Every week users must enter their time in a timesheet. Time is entered per week. For every combination of Project and Task a line is created in the timesheet. On that line you specify per day the amount of hours you have worked. On every line you can add a general remark. Next to that per timesheet line per day you can specify the work that has been done.
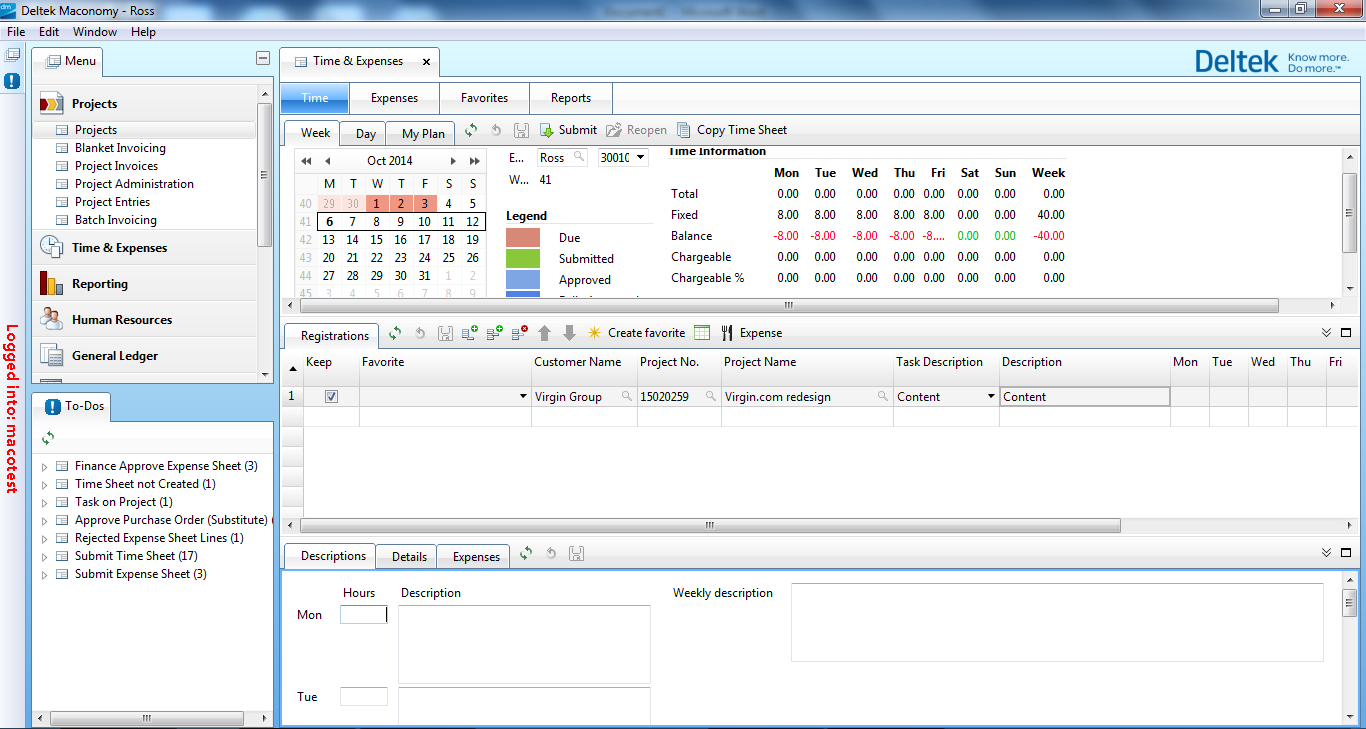
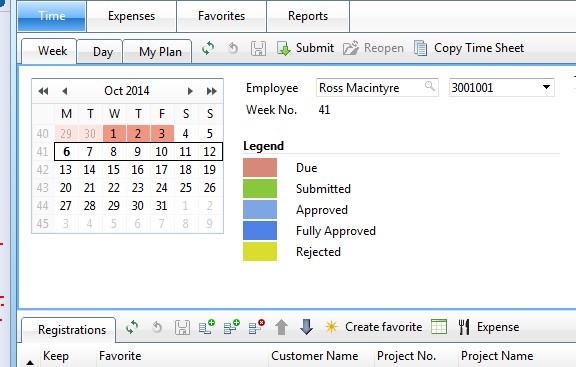
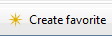
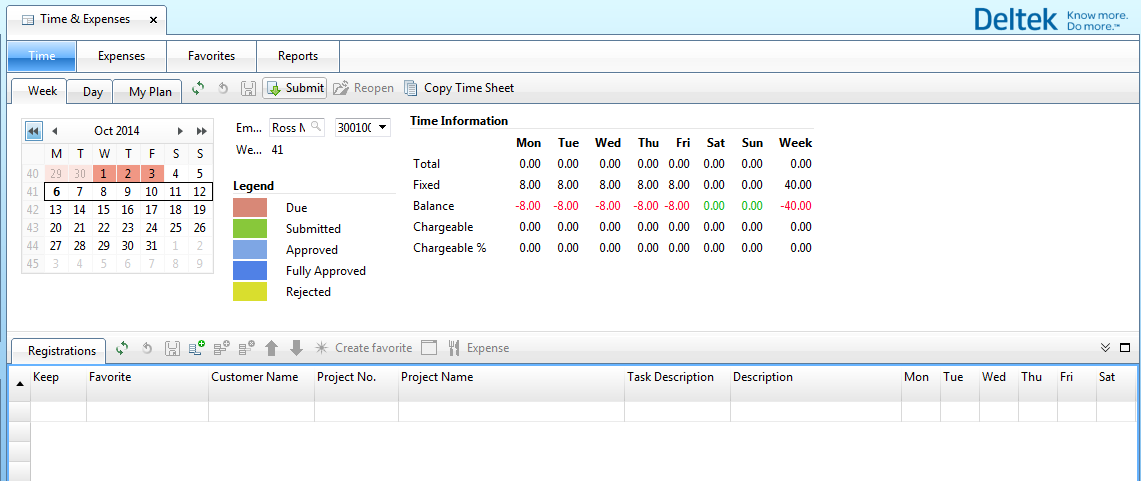
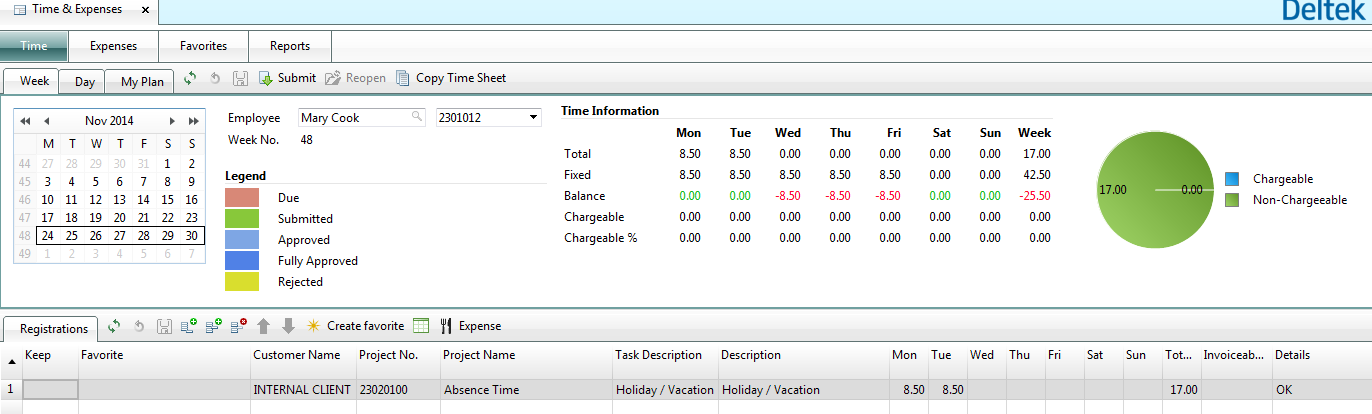
Open the Workspace Time & Expenses. The timesheet now opens in the current week. On the calendar the current day is shown in bold. To the right of the calendar, the coloring is explained in a legend. This way you can see in a blink of an eye which weeks are to be submitted and which timesheets have been approved.
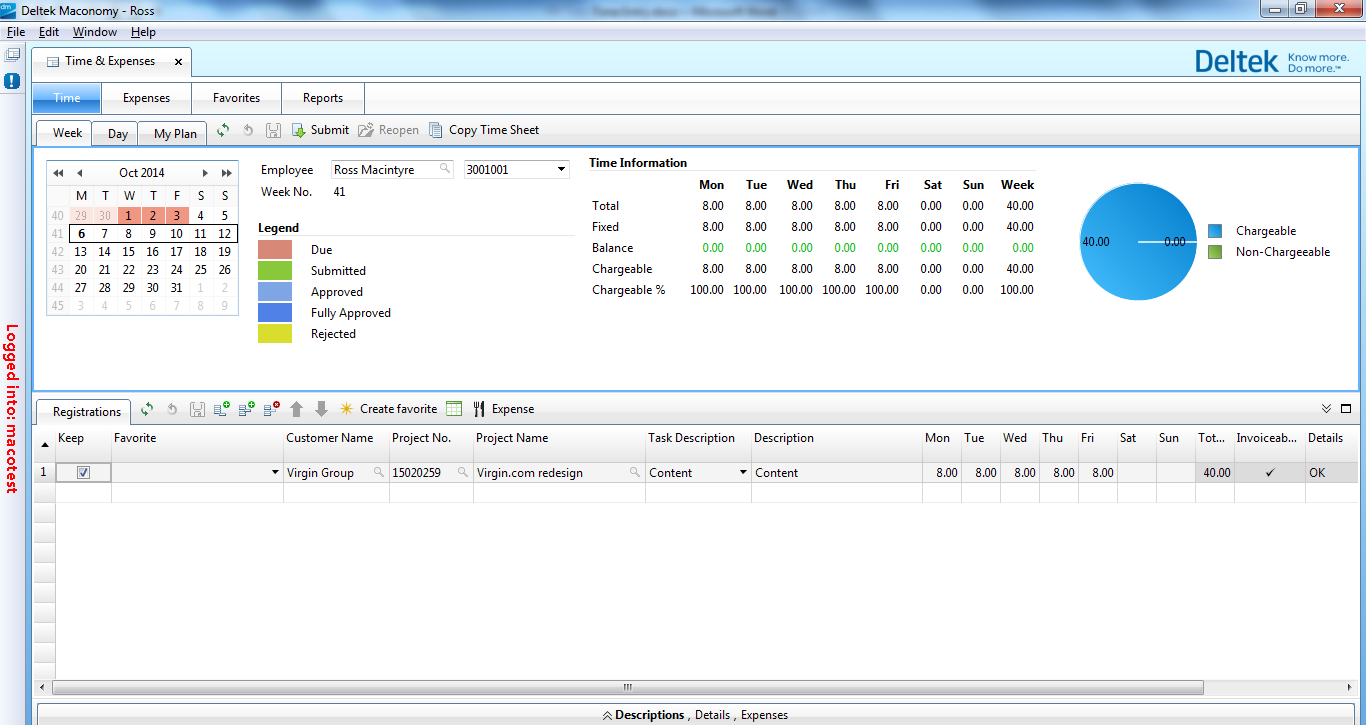
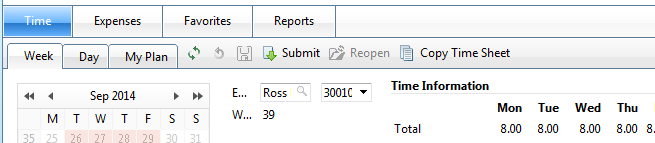
On the right of the card pane the details for that week are shown.
In the first island the amount of hours booked versus the contract hours are shown. This way, from the line ‘Balance’, you can directly see for which day the hours should be completed. This island also shows the chargeable hours booked. These are hours which can be invoiced to the customer.
On the right a pie chart shows the Chargeable vs. Non-Chargeable hour are displayed.
Created with the Personal Edition of HelpNDoc: Write eBooks for the Kindle
Entering Time
Entering Time
- Select the last week’s timesheet in the calendar by clicking on the first day of that week. (Note that the week is shown in Red, meaning this week is due).
In the sub-tab ‘Registrations’ all lines already entered on that timesheet will be shown. When you enter time for the first time there will be no lines present.
- By pressing the ‘Add Time Sheet Line’ button, you enter the first line.
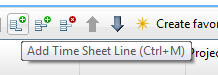
A new line will be added to the timesheet.

On this line you see the fields Project No. and Project Name are yellow. This means you must select a project. This can either be done via the field Project No. or Project Name. Also note the last column ‘Details’. It shows the text Project?. This means: please enter a project on this line. When all (minimum) relevant data has been entered on the line, this column will show OK.

- Select project 11020368 - CI - Posters & Artwork to supp. Product by typing the number or name or part of the name in the column Project No. or Project name. Maconomy will now show the first 5 projects which match the search criteria.
Using the magnifying glass, you can search on more criteria, such as specific project data, project manager, cost centre, etc.
- Select the project 11020368 - CI - Posters & Artwork to supp. Product
Note that the customer name is automatically filled in. This has been derived from the project.
You can save this line by pressing enter or clicking the save button to the right of the ‘Registrations’ tab.

In the Details column the text Task? Is shown meaning you need to enter a task on that line.
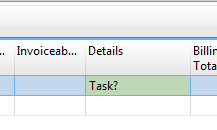
- Go to the column task and select a task. You must always enter a task from the list. Each project has its own list of tasks. When you change the project on a line, in most cases you will need to change the task too as the entered task is not available for that project.
- You can select a task by typing in the name of the task or by using the drop down button in the task field.
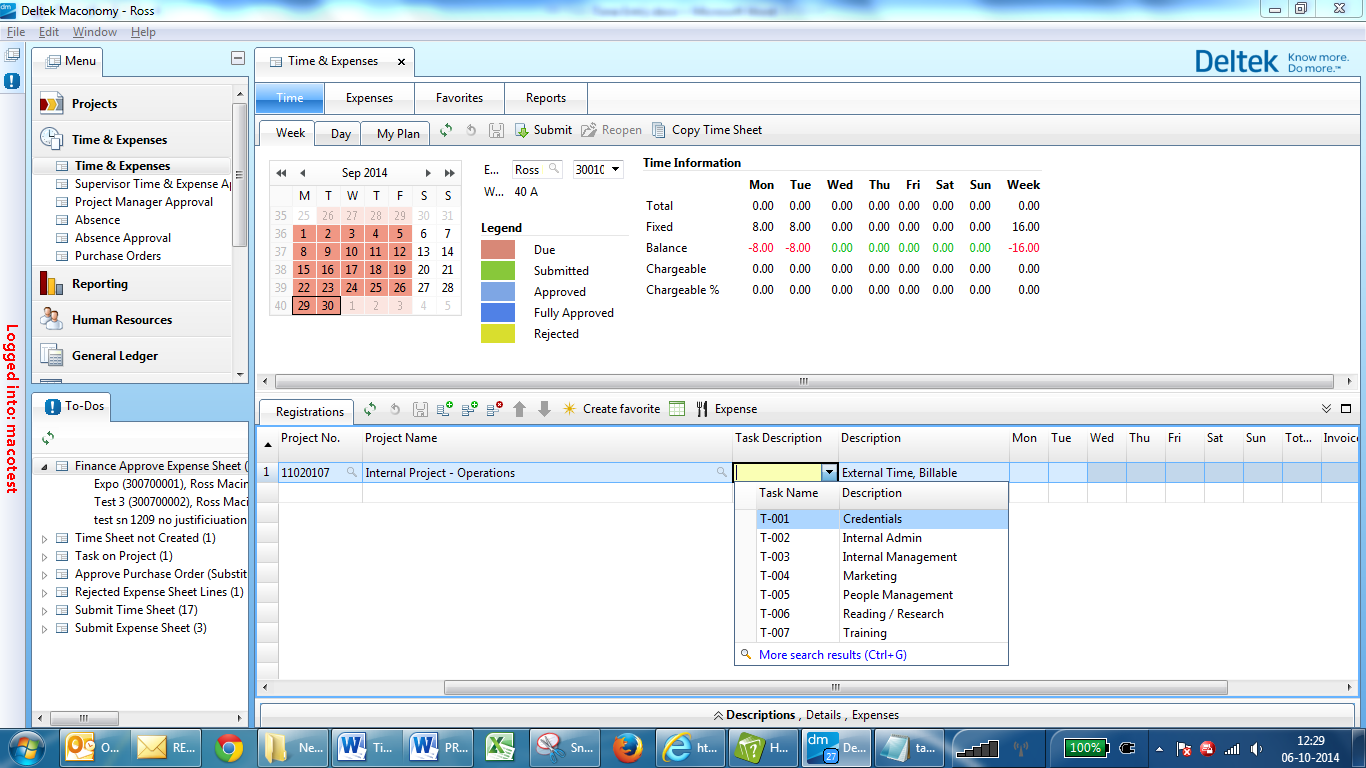
Select a task using the data from the next page.
You have worked the following hours on that project:
Day Task Quantity Remark
Monday - Brand Relations 4 hours write report
Monday - Research 2 hours Documentation
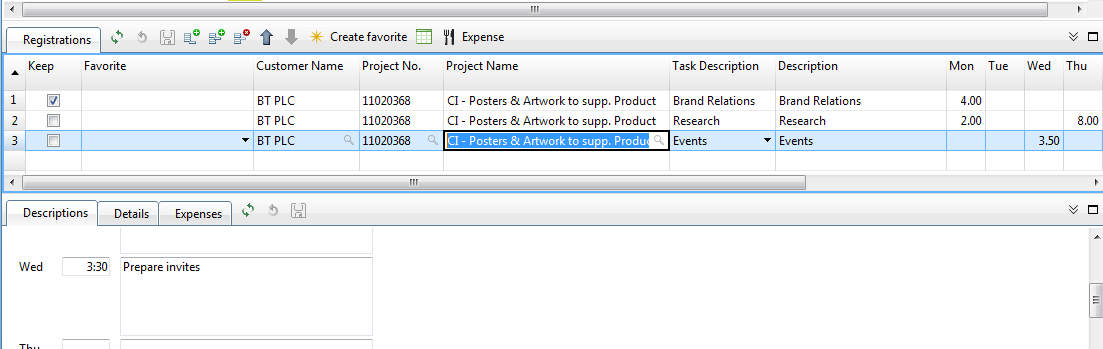
Wednesday - Events 3.5 hours Prepare invites
Thursday - Research 8 hours Search on internet
Enter the worked hours in your timesheet according to the details above.
(Note that as there are 3 different tasks, so you need to enter 3 lines on the timesheet).
For the task Research you entered one line and specified the hours on Monday and Thursday.
Click on the expansion on the bottom of your screen to fold out the pane
Here you can specify the activities you did per day by selecting the line in the Registrations Tab.
The description on the Timesheet line is used for the invoicing process. Therefore please make sure this is an understandable description. The daily description in an internal description and is used by the Project manager and your supervisor in the approval process.
- Complete the timesheet by entering various new lines and make sure the hours entered match the fixed hours per day. Try out the other buttons:
 = Insert a line. The line will be inserted above the selected line.
 = Delete line. Deletes the selected line.
 = Go up or down through the timesheet lines. You can also use the arrows on your keyboard.
 = Create favorite. Lines from last week’s timesheet which are marked with Keep will be created as Favorite.
 = Export to MSExcel. In many panes in Maconomy data can be exported to MSExcel using this button
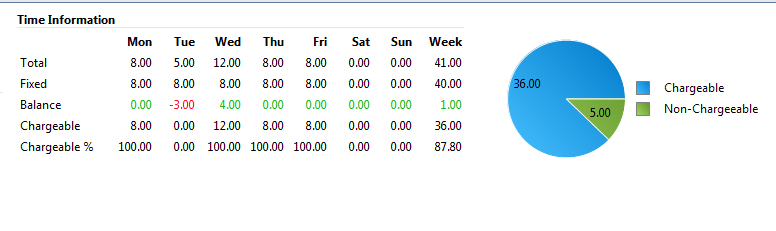
Make sure the total balance of the week is zero, or at least green (see below).
Created with the Personal Edition of HelpNDoc: Easily create Web Help sites
Partial Week Timesheet
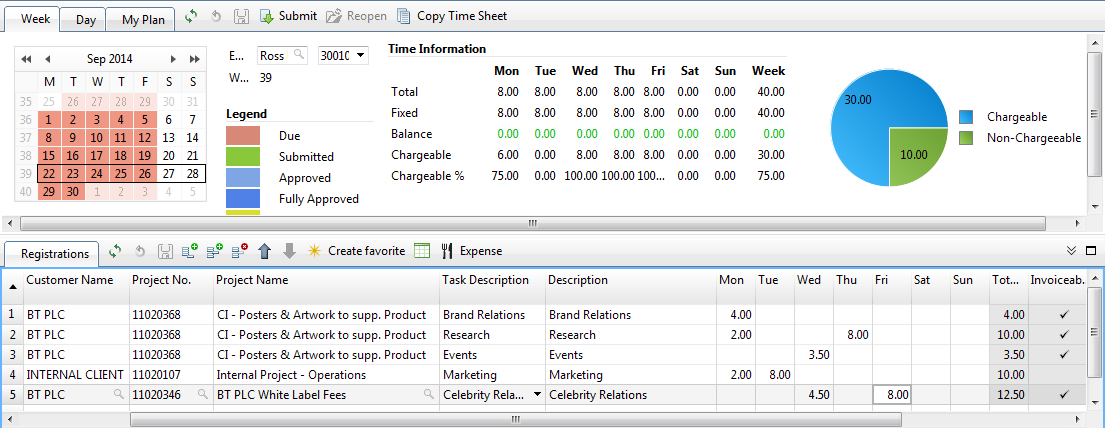
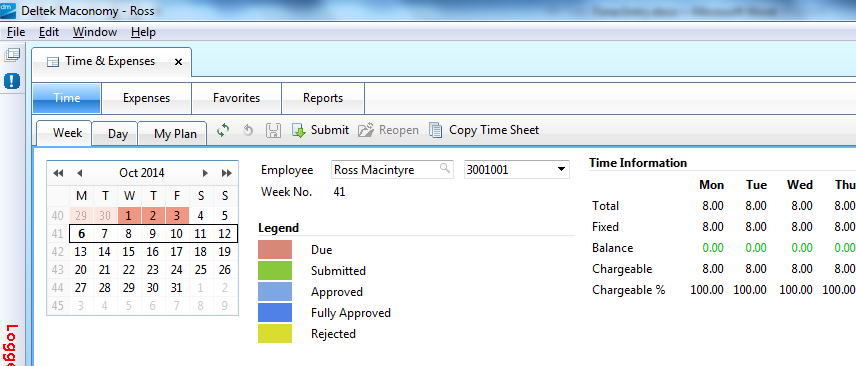
In case a month starts in the middle of the week, the timesheet will consist of a Part A & B. See for example week 40 of 2014. The first of October starts on Wednesday. Therefore one part of the timesheets is part of September; the other part belongs to October. These timesheets must be treated as 2 timesheets and thus every part must be submitted separately. See the picture below where for September only Monday and Tuesday time can be entered on. Wednesday, Thursday and Friday are greyed out. The hours for that part of the week must be entered in Timesheet 40B. Just click in the calendar on the 1st of October to enter time for Week 40B.
Created with the Personal Edition of HelpNDoc: Easily create PDF Help documents
Submit Timesheet
- Submit the timesheet by using the Submit button in the tab Week. This will create To-Dos for the project managers of the projects used in your timesheet.
When you have submitted your timesheet and need to correct or add some extra text to the timesheet, you can simply change the line you would like to correct as long as this line is not approved yet. The timesheet will then be opened. After your changes you will need to submit the timesheet again.
In the calendar the submitted week will turn Green to show this week is completed.
When hours on the timesheet have been approved they cannot be changed anymore.
For corrections on Timesheets please contact your finance team.
Created with the Personal Edition of HelpNDoc: Easily create HTML Help documents
Rejected Time
When the hours are not correctly booked, the Project manager will reject the hours. This means they are sent back to the user with the request to correct the line. When your hours are rejected they will show in your To-Do list.
Here the hours on Project 11020368 on the first of September 2014 have been rejected.
- When you double-click on that line it will bring you to the timesheet where you can read the comment from the Project manager and act accordingly.
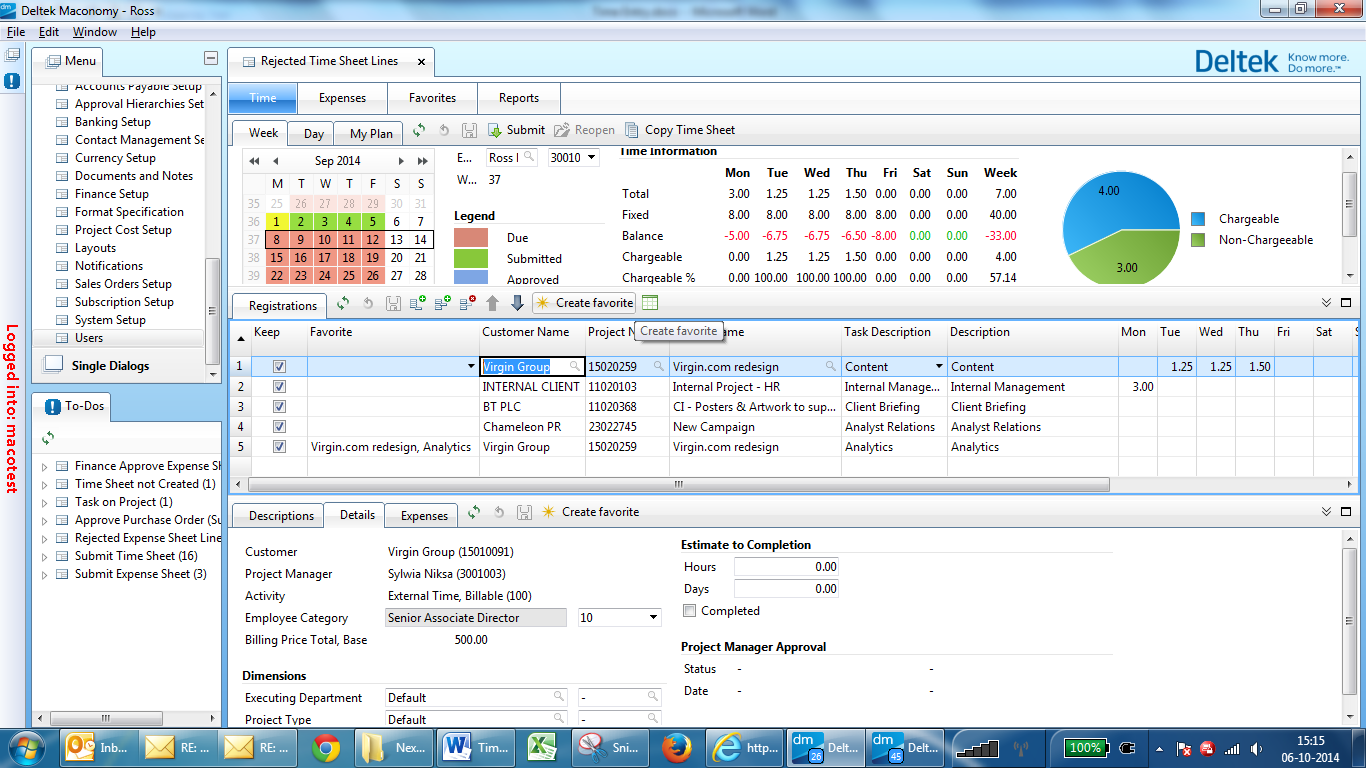
In the picture on the next page you can see the rejected line. The workspace Rejected Time Sheet Lines is opened and the specific week is shown. The line which has been rejected is marked Yellow. In the expansion below on the second tab ‘Details’ you see the comment from the Project Manager (also shown in Yellow).
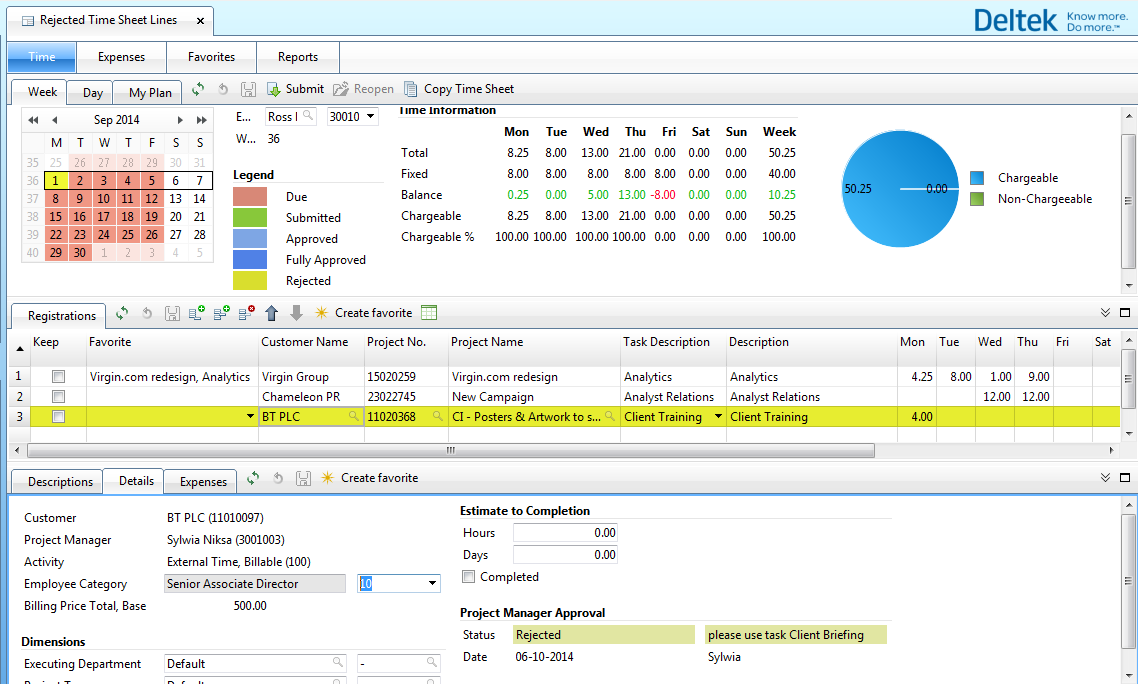
- Here you can correct the line by changing the task to ‘Client Briefing’. Then you can submit the timesheet again. The project manager will get a To-Do to approve the timesheet lines.
Please note the time sheet line will still have the status ‘Rejected’ until the project manager approves the line.
Created with the Personal Edition of HelpNDoc: Easily create EBooks
Keep Functionality
On the timesheet every line can be marked with ‘Keep’. This means that when this field is marked, the line will be copied to the next timesheet, by clicking in the next week. This will make it easier for the user to enter time as many Project task combinations have already been entered on the timesheet.
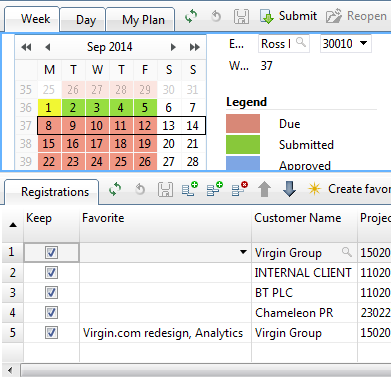
- Open a Week and enter time on that timesheet. Mark the first column called ‘Keep’. Press Enter or use the Save icon.
- Click on the next Week and notice that the line from the previous week is copied to this timesheet.
When you do not want to keep a certain line on your timesheet anymore, simply untick the box in the column ‘Keep’. For the next week this line will not be shown anymore.
Created with the Personal Edition of HelpNDoc: Easily create HTML Help documents
Favorites
A Favorite is an often reoccurring combination of Project and task (and other dimensions). These predefined combinations can be used using the dropdown in the Favorites column. Favorites are user specific and can be maintained by the user itself. Favorites can be created from a timesheet, or manually via the Section ‘Favorites’.
Create favorite from Timesheet
Create favorite via the Section Favorites.
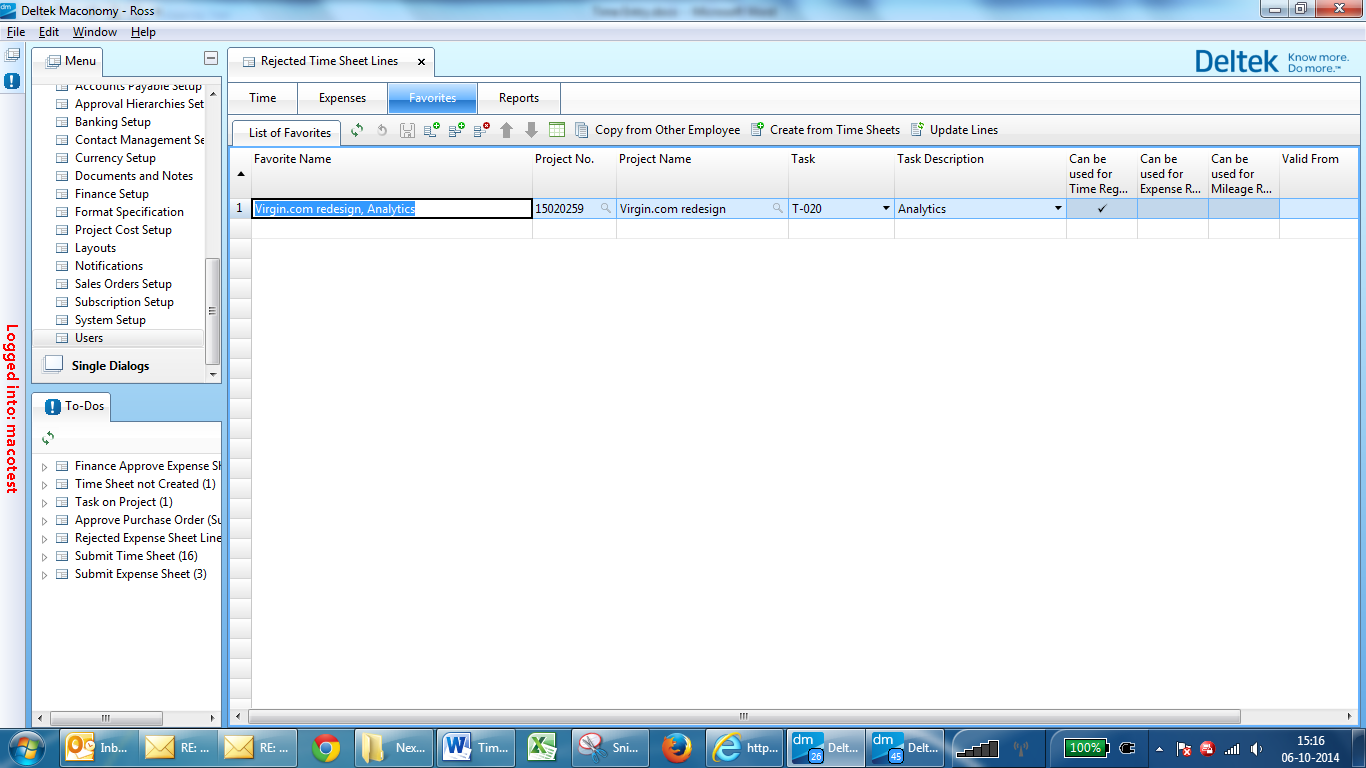
In the Section Favorites you have the ability to create favorites from other employees or copy them from your own timesheet. When a favorite is changed in this window, via the button Update Lines you can update all unsubmitted lines.
- Create Favorites from your timesheet by using the button
 .
.
- Copy Favorites from another Employee by using the button

You will be asked to enter an employee name. Select a name by typing the name in the field, or by using the magnifying glass.
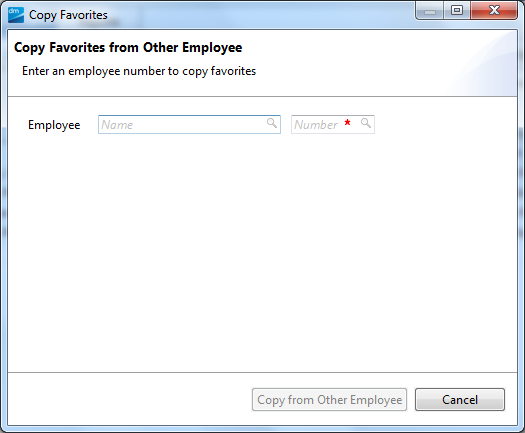
When you have selected an employee, press Copy from Other Employee‘’. Of course this employee must have favorites available.
Created with the Personal Edition of HelpNDoc: Full-featured multi-format Help generator
Copy Timesheet
Another way of entering time on your timesheet is by copying the previous timesheet to the current timesheet. This can come in handy when you are working for a fixed period of time on several project and on the same tasks.
- Select a week without any timesheet lines by clicking on the first day of the week.
Click on the ‘Copy Time Sheet’ button.
A window opens where you can select the week you would like to copy.
You can either select the first day of the week or enter a week number.
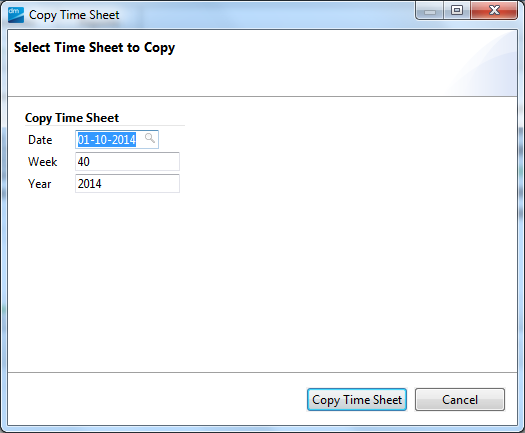
Select the week you want to copy by entering a date or a week number.
All lines from the selected timesheet are copied. Please notice no hours are entered and any line marked as ‘Keep’ is not marked in the new timesheet. Enter your hours and daily descriptions and submit the timesheet.
Created with the Personal Edition of HelpNDoc: Write eBooks for the Kindle
Expense Sheets
Whenever you have costs which can be reimbursed, you can claim these costs using an expense sheet. Your expenses can be entered per project or per period. On the expense sheet line you must specify the project against which the costs are booked. Per expense (receipt) a line is created where the costs are being justified. This justification is needed for internal auditing, but also for clarification to the customer.
Open the Workspace Time & Expenses. The timesheet now opens in the current week. Click on the Section ‘Expenses’ to open the expense sheet windows.
The expenses module is opened. Here the screen is divided into 3 parts:
- List of expenses
- Expensesheet Header
- Expensesheet lines
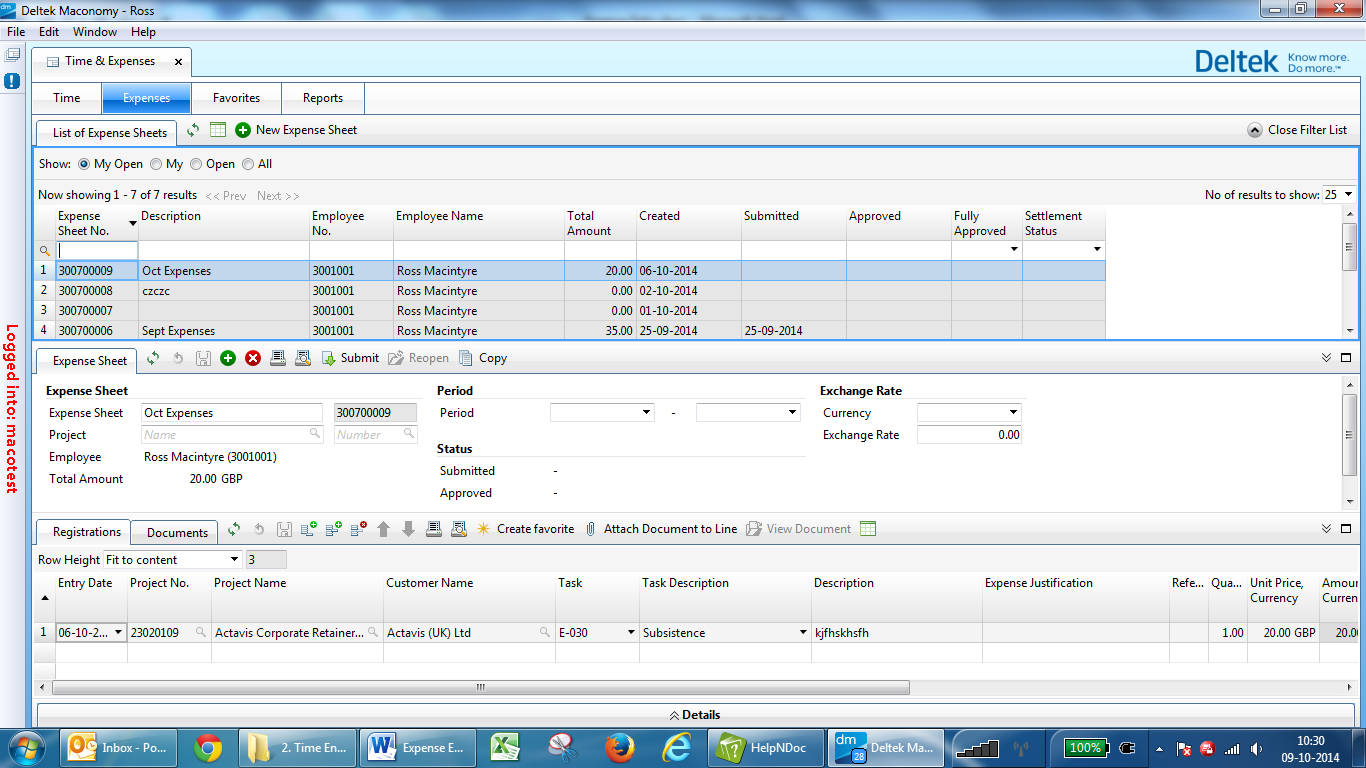
- The list of expenses show all your expenses, open and approved.
- This part shows the general information of the selected expense sheet.
- The details (receipts) of the expense sheet
Created with the Personal Edition of HelpNDoc: Easily create PDF Help documents
Entering Expenses
Entering Expenses
- Start the New Expense sheet Wizard by clicking on the Button
The following wizard will open:
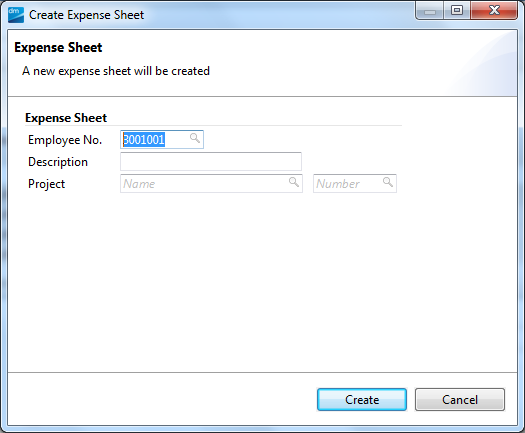
Your employee number is prefilled.
Go to the ‘Description’ and enter in a few words what expenses this are. This can be a specific project, a specific trip or your expenses from last month.
When your expenses relate to only one project, you can specify that project in the field ‘Project’. Maconomy will then prefill the project number specified here on every new line to add on the expense sheet. Or course you can always change the project number in the expense sheet lines.
Click ‘Create’ to finish this wizard. The expense sheet will be created and you can proceed with entering your receipts in the lines.
Please note the expense sheet is created with the British Pound (GBP) as the default currency.
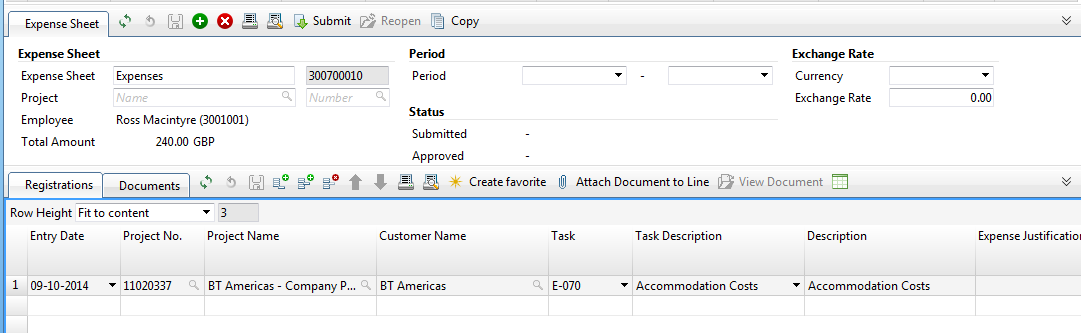
When the expense sheet is created, please enter a date interval in the island ‘Period’ in which the expense have been made.

- By pressing the ‘Add Expense Sheet Line’ button, you enter the first line.

A new line will be added to the expense sheet.

On this line you specify your first receipt.
Entry date:
First select the date on which the expenses have been made. Please refer to the date on the receipt.
Project No. / Name:
The next fields Project No. and Project Name are shown yellow. This means you must select a project. Select the Project against which the costs must be booked. In case you have filled in a project (number) on the header, the project fields Number and Name will be prefilled with that project every time you add a new line.
Select a project and press enter.
Task:
Go to the next field ‘Task’ or ‘Task Description’. Click on the Drop down button to select the relevant task. Please note only expense tasks are shown here.
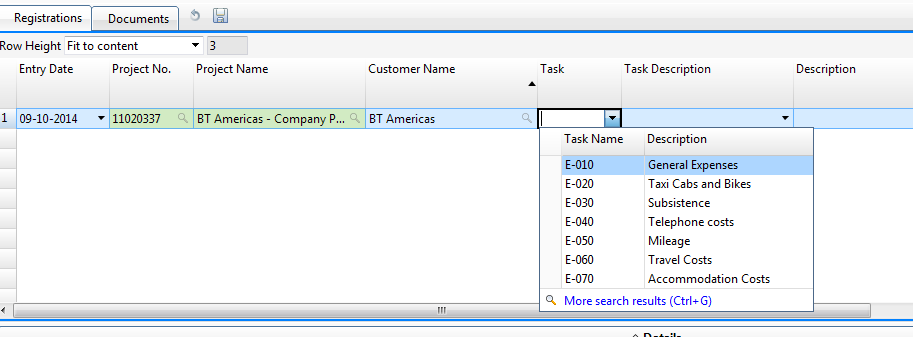
Select one of the tasks and press enter. The fields ‘Task Description’ and ‘Description’ are automatically filled.

Description:
In the field ‘Description’ enter the more detailed description for your claim. This description will be visible on the invoices to the customer.
Expense Justification:
The field ‘Expense justification’ is an internal explanation. Here you specify details like where from, where to, what kind of expense, names of the persons in case of a dinner receipt, etc. Please be as clear as possible.
Reference:
You manually number your receipts in a subsequent order. These numbers are the reference to the expense sheet. In the field ‘Reference’ you type in the number written on the hardcopy.
Quantity:
In most cases this will be ‘1’.
Unit Price, Currency:
Enter the total amount of the receipt, including VAT.
All other fields will be reviewed by the finance team so please leave these empty. For every single receipts add a separate line.
Created with the Personal Edition of HelpNDoc: Single source CHM, PDF, DOC and HTML Help creation
Adding Receipts to the Expense Sheet
Adding Receipts to the Expense Sheet
In order to check all expenses the receipts need to be added to this expense sheet. First scan all receipts to a PDF file. You must now add these PDF files to the expense sheet in Maconomy.
- Attach the scanned receipts by first clicking on the documents tab.
Then choose ‘New’ to add the new document.
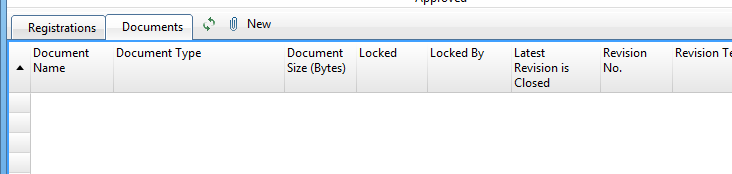
A new window will popup where you can select the file to attach. Once saved the document can be viewed using the show button in this tab.![]()

Created with the Personal Edition of HelpNDoc: Easily create iPhone documentation
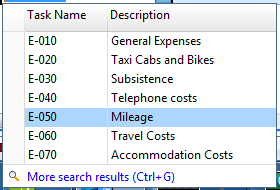
Mileage
Mileage
When you have used your car for business purposes, the mileage can be claimed using the expense sheet. Enter a line, choose the correct project and select the Mileage Task. In the field Quantity enter the mileage. The standard price of 45 pence is filled in in the field ‘Unit Price, Currency’.
- Add a new line to the expense sheet with mileage. Note the unit price is filled automatically.
Enter a justification to where you specify the travelling. Fill in the mileage in the field ‘Quantity’.
Created with the Personal Edition of HelpNDoc: Free iPhone documentation generator
Submit and Print
Submit and Print
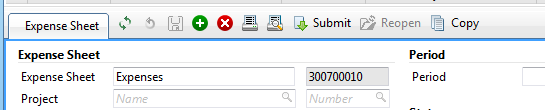
When all receipts have been entered on the Expense sheet and the documents have been attached to the expense sheet, the expense sheet can be submitted.
- Press the ‘Submit’ button on the expense sheet header.

This will sent a To-Do to the project manager(s) to approve your expense sheet. After the Project manager’s approval the Finance team will review the expense sheet and approve the expense sheet.
For legal and tax reasons all receipts must be stored. Therefore your expense sheet must be printed and your receipts must be attached to this printout. Then hand them in at the finance department.
- Print your expense using the print button:
The expense sheet will be shown on your screen as PDF. Print the document on a printer, and hand them in, together with the receipts at the finance team.
Created with the Personal Edition of HelpNDoc: Full-featured multi-format Help generator
Reopening your expense sheet
Reopening your expense sheet
When the expenses have not yet been approved, you are able to change them. In case you need to add any additional comments, just look up the expense sheet and click on the expense sheet line you wish to edit. Maconomy will warn you, you are reopening a submitted expense sheet.
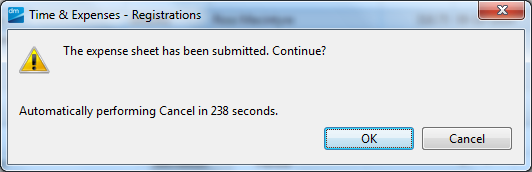
- Edit a line on your submitted expense sheet. Answer ‘OK’ and continue to edit the line by adding your comments. Once finished you need to submit the expense sheet again.
Please Note: once an expense sheet line is approved by the project manager, this line cannot be edited anymore.
Created with the Personal Edition of HelpNDoc: News and information about help authoring tools and software
Project Manager Approval of Expense Sheet
Project Manager Approval of Expense Sheet
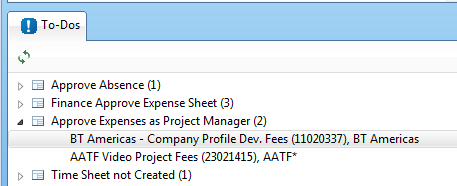
Once the Expense sheet has been submitted, the project manager(s) will get a To-Do. This To-Do is shown in the Notifications area of your screen (Bottom left). The To-Do is called ‘Approve Expenses as Project Manager’
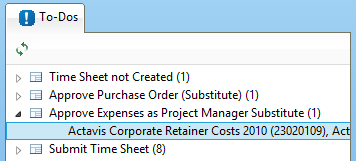
A Notification will also be sent to the Project Manager Substitute. This is a backup approver in case the Project Manager is not available i.e. on leave. This is also the approver of the Project Manager’s expenses. The To-Do is called ‘Approve Expenses as Project Manager Substitute’
- Open the approvals by clicking on the name of the To-Do (see arrow). This will open the workspace where the project manager can approve or reject the expenses.
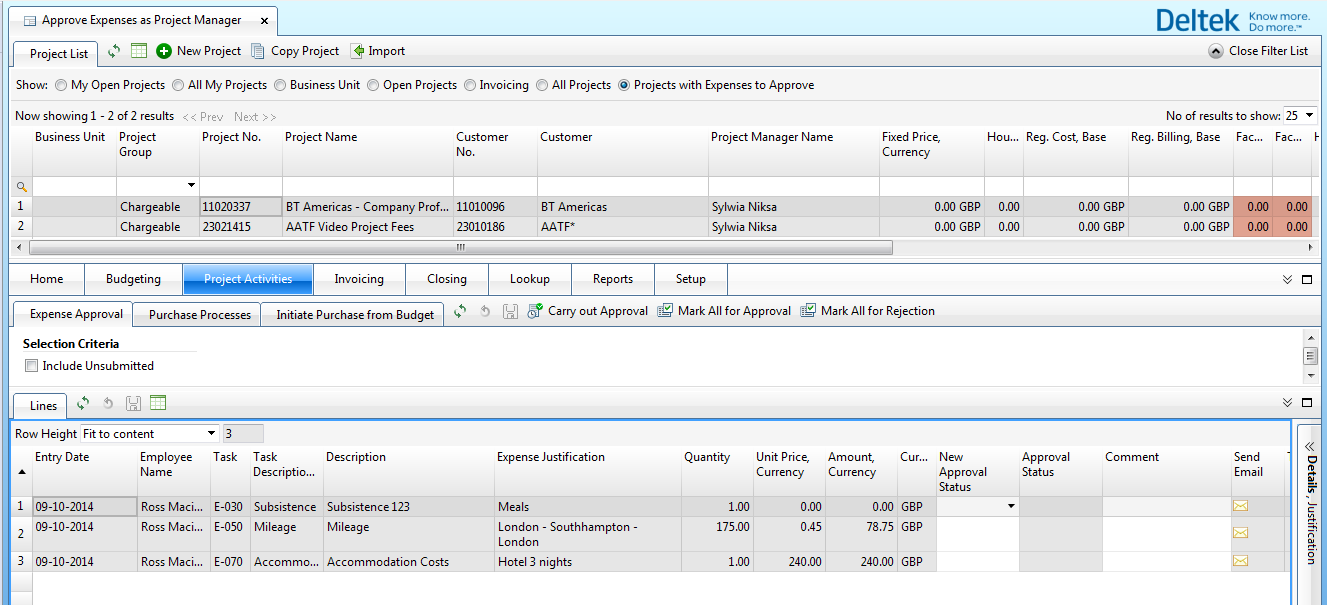
Here all expenses to be approved are shown. The project manager can review the expenses and approve or reject them. From this window it is also possible to mail the employee regarding the expense.
- Reject one line by selecting ‘Rejected’ from the drop down box and add a comment to the line. Approve all other lines.
TIP: First use the button ![]() and then change the one line to ‘Rejected’.
and then change the one line to ‘Rejected’.
- Select ‘Carry out Approval’ to finalize this step and approve (or reject) the lines.
Created with the Personal Edition of HelpNDoc: Create HTML Help, DOC, PDF and print manuals from 1 single source
Rejected Expense Sheet Lines
Rejected Expense Sheet Lines
When a line has been rejected, you will receive a To-Do for that.
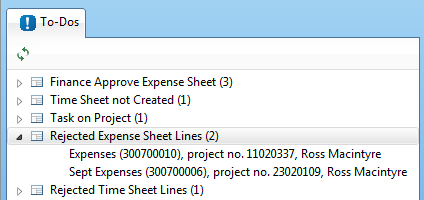
- Double click on the To-Do. The Workspace will open and the expense sheet with the rejected lines are visible. On the lines you can see in the field Approval, Project Manager which line has been rejected. In the comment you can see the reason why the expense is rejected.
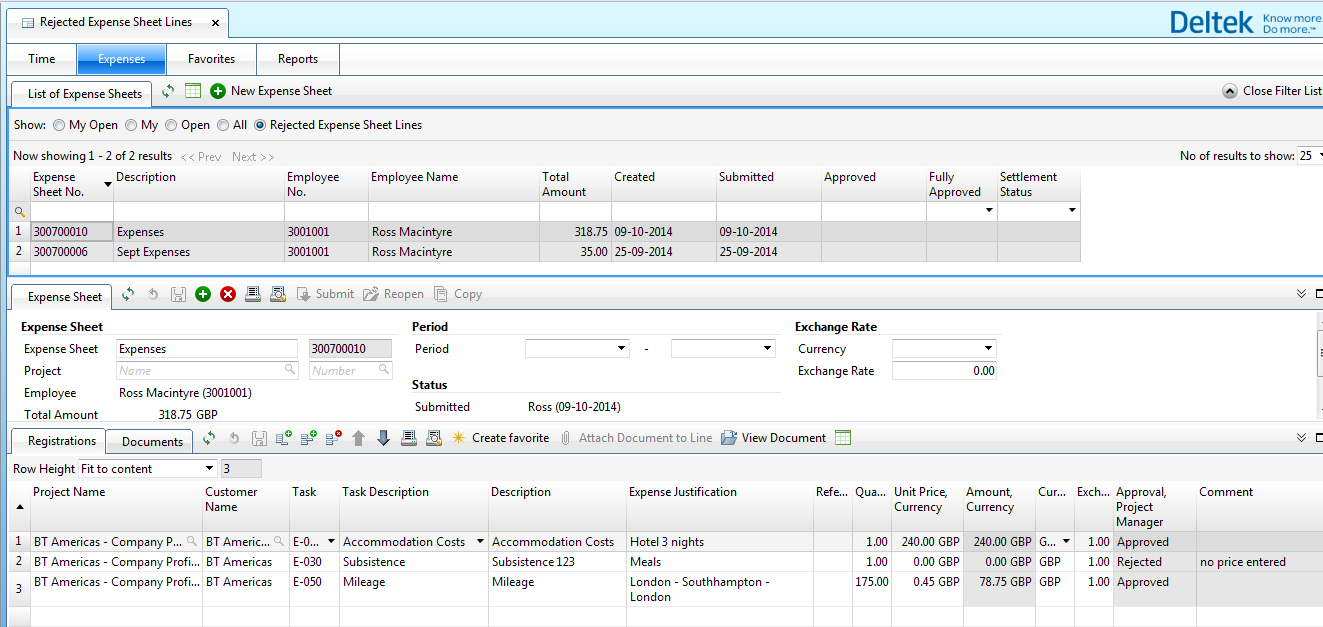
- Correct the line and resubmit the expense sheet line.
- Please note the line will still have the status ‘Rejected’. Once the line has be reviewed and approved by the Project manager, the status of the line will change to ‘Approved’ and the finance team will need to approve the expense sheet.
- Log in as project manager and approve the corrected expense sheet line.
All lines have been approved now. The finance team will handle the expense sheet.
Created with the Personal Edition of HelpNDoc: Easily create CHM Help documents
Checking the Status of your expenses
Checking the Status of your expenses
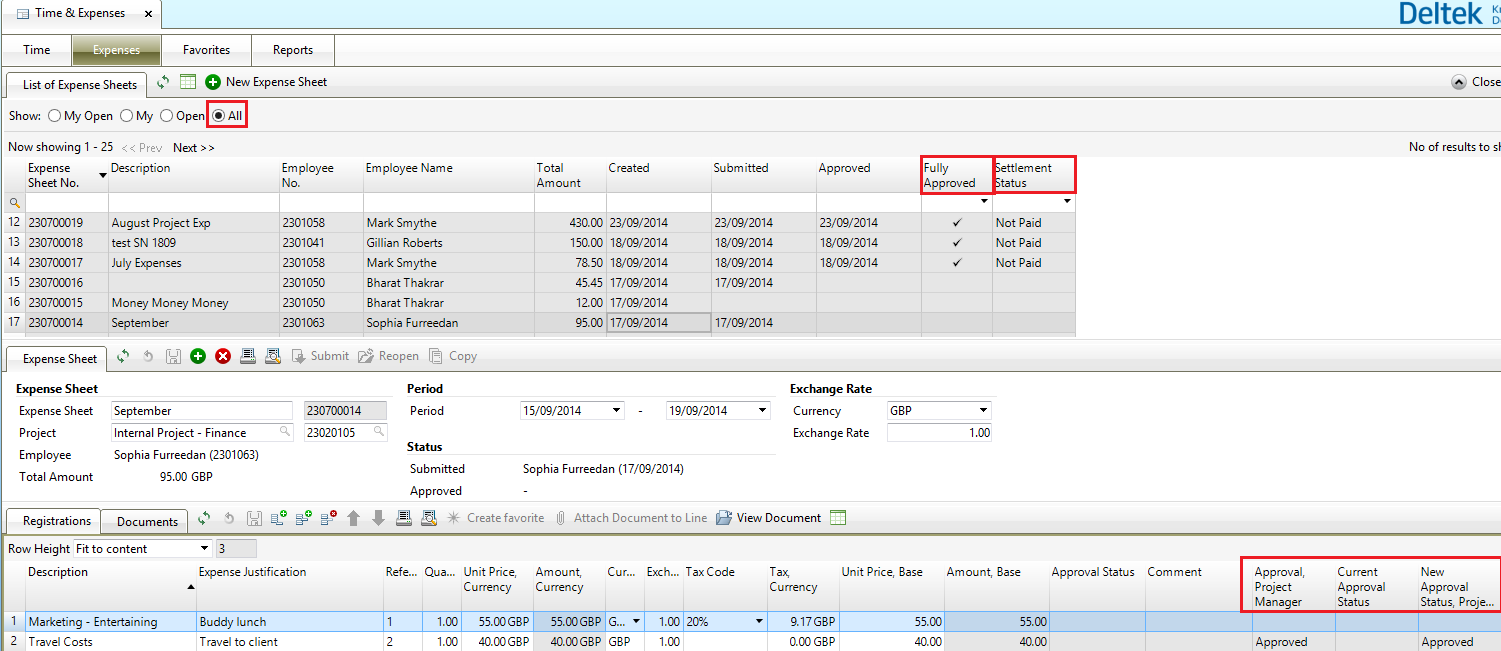
Once ALL lines of the expense sheet have been approved, the expense sheet will go to finance for final checking and approval.
You can check the status of your expenses by going back into the Expense Entry Page, click on the All option. You can see in the Filter, the status and whether they have been paid.
Created with the Personal Edition of HelpNDoc: Easily create Web Help sites
Absence Request
When you want to book your holiday, you need to submit the request first. Once it is reviewed and approved by your Line Manager/ Absence Approver, the entry will be populated on your timesheet automatically.
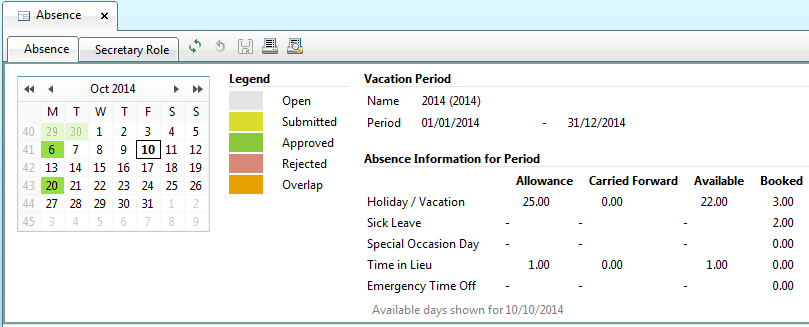
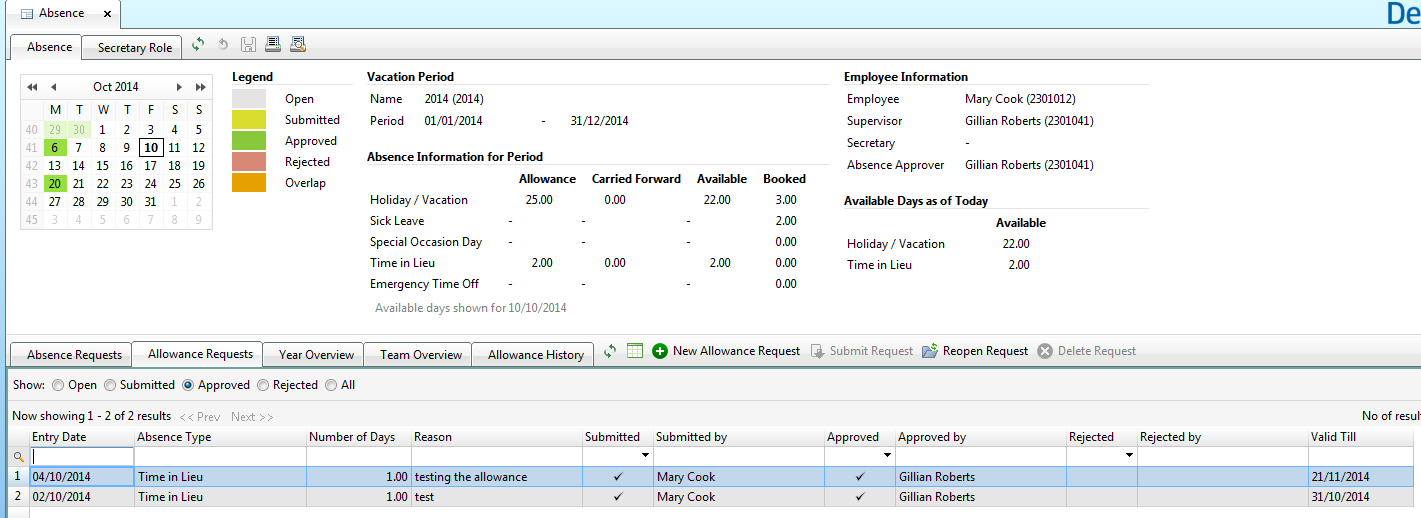
Open the Workspace Absence under Time & Expenses and ensure the Absence tab is selected.
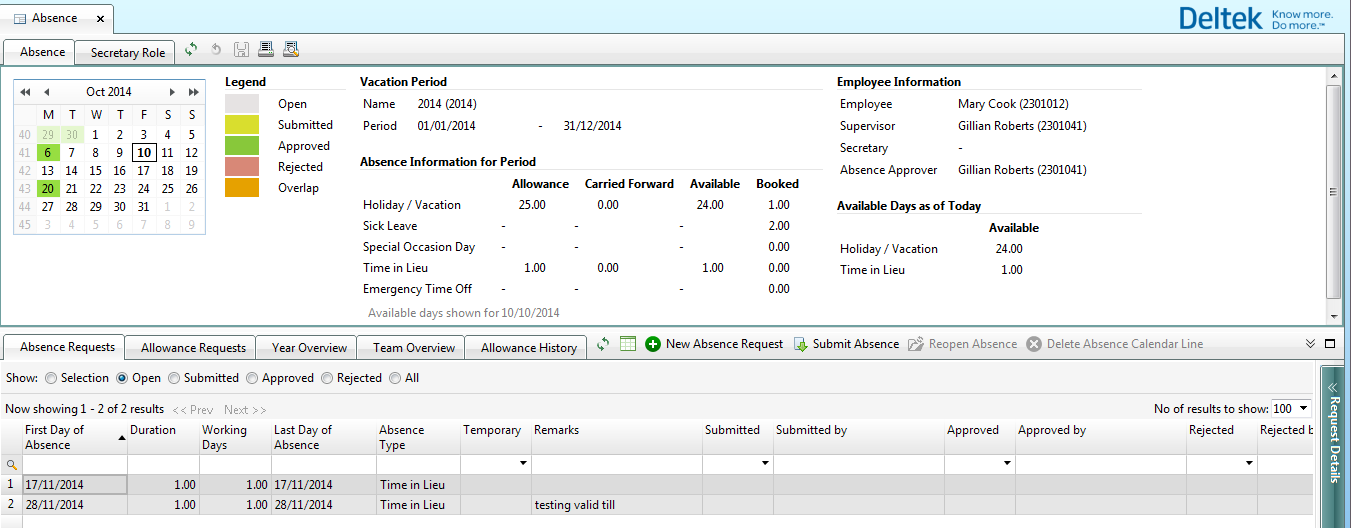
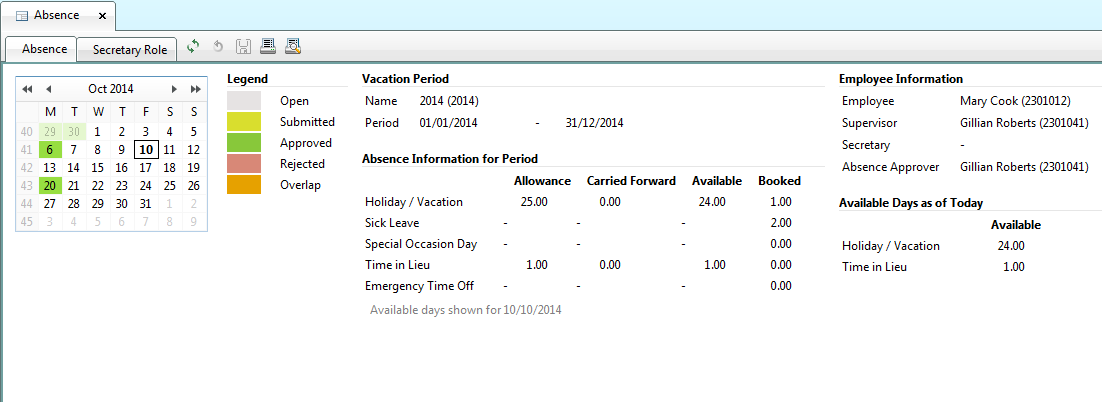
In the header part of Absence tab, there is the overview of most popular absence types displayed; the Absence Information for Period shows the Allowance, the days Carried Froward, Available and Booked.
Under Employee Information island, you can find the details about your Line Manager/Supervisor and Absence Approver so that you know who should be chased for your absence request’s approval.
The Absence requests are colure-coded based on the legend located in the top part of the Absence section.
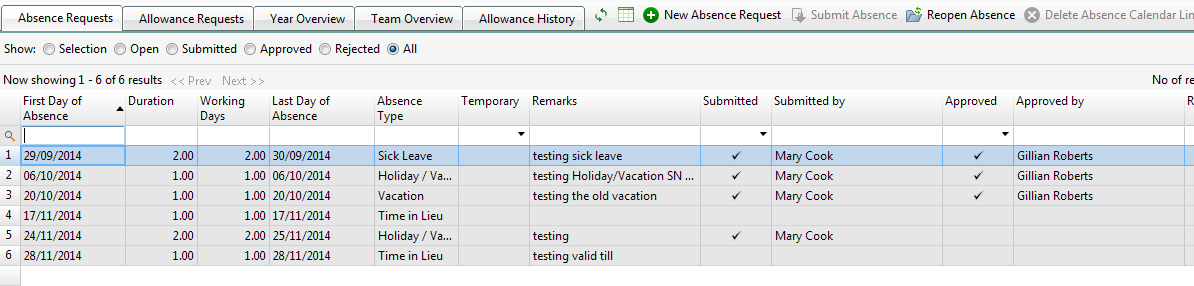
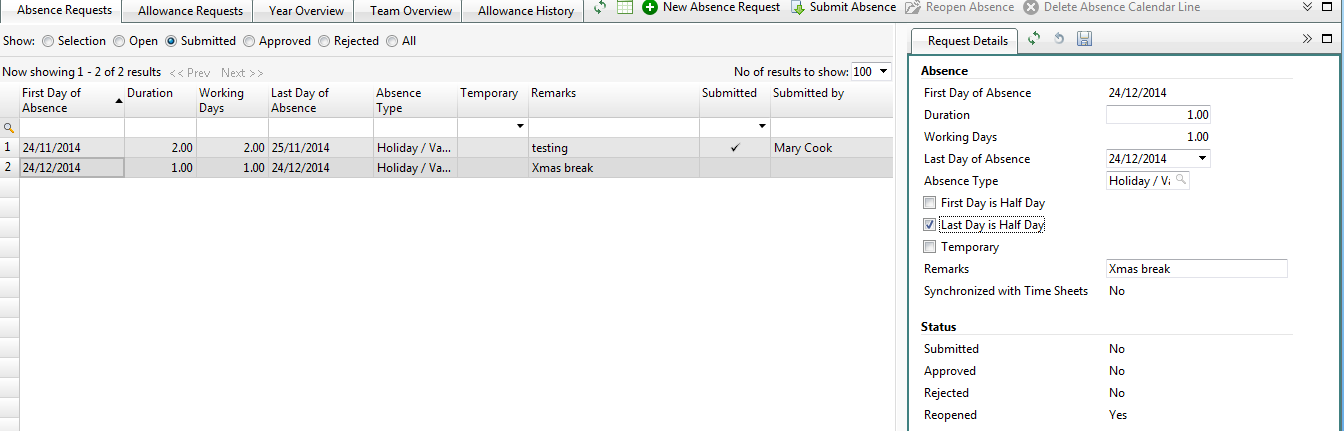
Go to Absence Request tab in the table section. By using the radio buttons, you can see the status on all requests created so far.
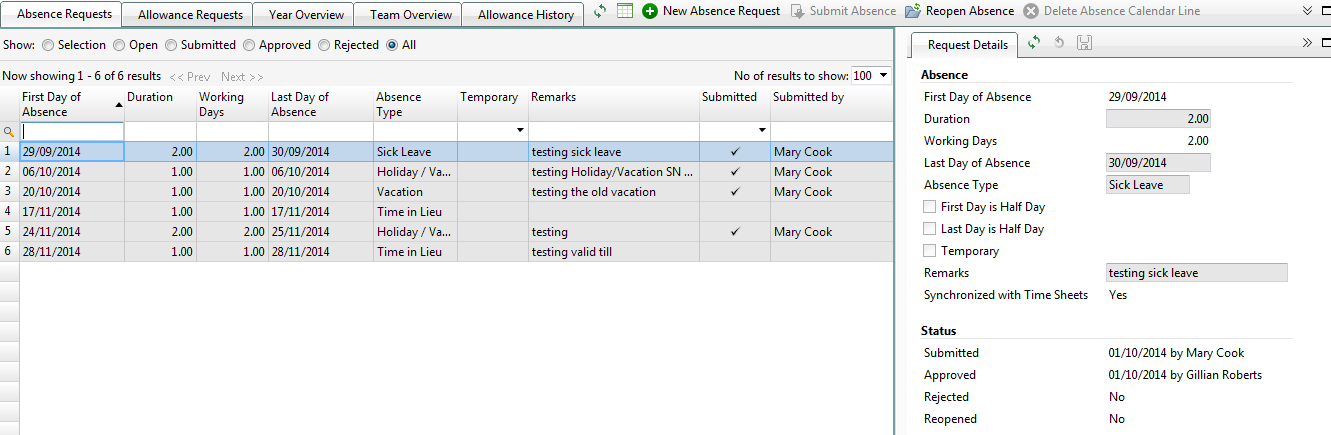
If you want to drill down to more details and review when you request got approved, please open the sliding panel on your right hand side called Request Details which reveals the full status of you absence request:
Created with the Personal Edition of HelpNDoc: Easy CHM and documentation editor
Submitting Absence Request
In order to create a new absence request press on the button 
The below wizard will get opened:
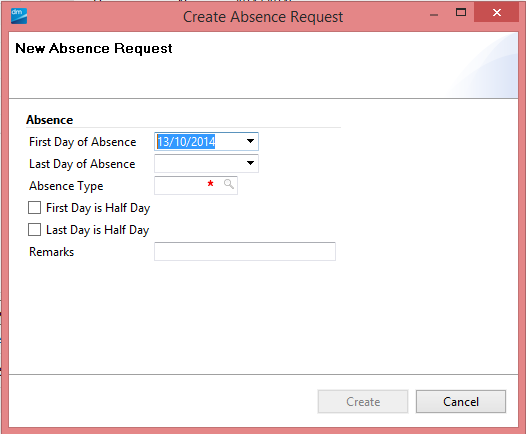
In the popup window enter the duration of the absence by entering the ‘First Day of Absence’ and ‘Last Day of Absence’
Select the type of absence you need by using the magnifying symbol  to view the full list of absence types or start typing the name.
Please note that the tick boxes ‘First day is half day’ and ‘Last Day is Half Day’ can be used whenever you want to take a half a day off which will deduct less time from your holiday allowance.
Go to Remarks and enter an internal reference to identify why this request was made. This will help your Absence Approver to review your request.
Press on the ‘Create’ button to finalise this wizard. Your absence request has been created and can be found under ‘Open’ requests. Please review the details and follow with the submission by clicking the button . This will send a To-Do to the Absence Approver to review and approve your absence request.

Created with the Personal Edition of HelpNDoc: Produce electronic books easily
Reopening your absence request
As long as your request has not been approved yet, you can re-open it, make some alterations and re-submit it.
Look up for the absence request, the radio button ‘Submitted’ comes in handy. Press on the button and then open the sliding panel ‘Request Details’ on the right to amend the previous record, press ENTER to save the changes.
Your altered absence request needs to be submitted again to appear under your Absence Approver To-Do list.
Please bear in mind that once your request is approved, only HR team can edit it on your behalf.
Created with the Personal Edition of HelpNDoc: Create cross-platform Qt Help files
Absence Request Approval
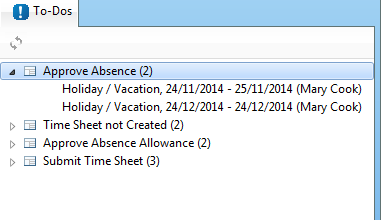
Once the absence request has been submitted, the absence approver will get a To-Do to action on. This To-Do is shown in the Notifications area at the left bottom corner. The To-Do is called ‘Approve Absence’
A Notification will also be sent to the Absence Approver Substitute. This is a backup approver in case the Absence Approver is not available i.e. on leave. The To-Do is called ‘Approve Absence Substitute’
NEED ASCREENSHOT OF THE NEW TODO
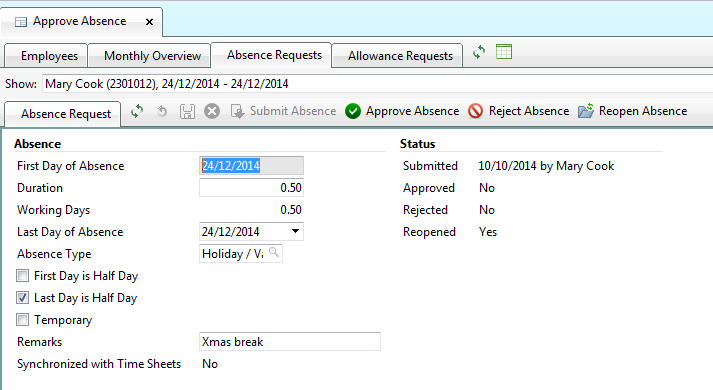
Open the approval by clicking on the name of the To-Do. This will open the workspace where the absence approver can review the request and decide on approving or rejecting it.
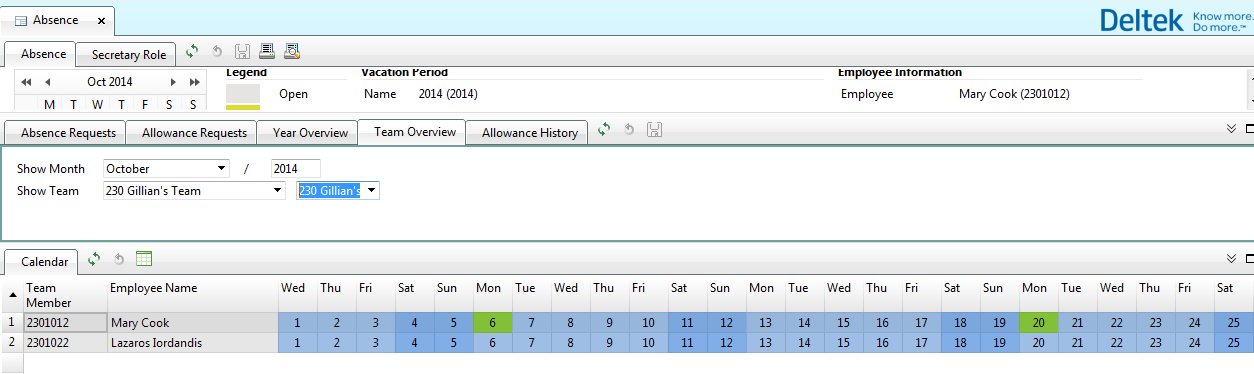
Each absence request is reviewed separately, you can open the sliding panels with the details for the team you look after to avoid any over-lapping. Go to Show Month and select the month the absence request has been booked for, then go to Show Team and chose the relevant one, press ENTER and hit the button  to validate your criteria:
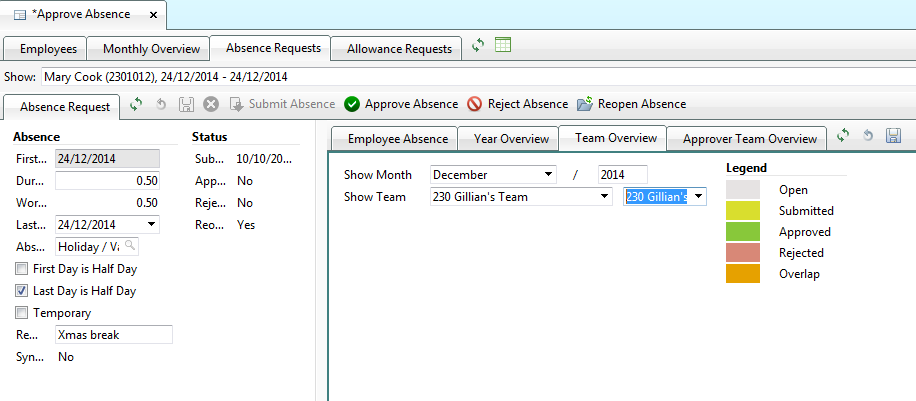
You will get the below prompt message, press OK and carry forward with the approval:
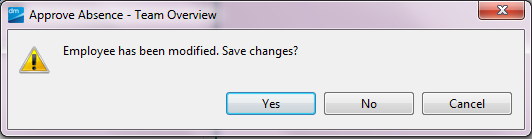
The Team overview will displayed the booked made by your team members for the whole month based on your previous criteria. In this case you can be assured there will not be any leave overlapping.

The same functionality is presented under the tab ‘Approver Team Overview’.
Collapse the sliding panel and go back to the Absence Request tab. Press on the icon to approve the request, the new To-Do will be sent to the individual who booked their time off.

The days included in the absence request will turn into Green indicating the approved leave:
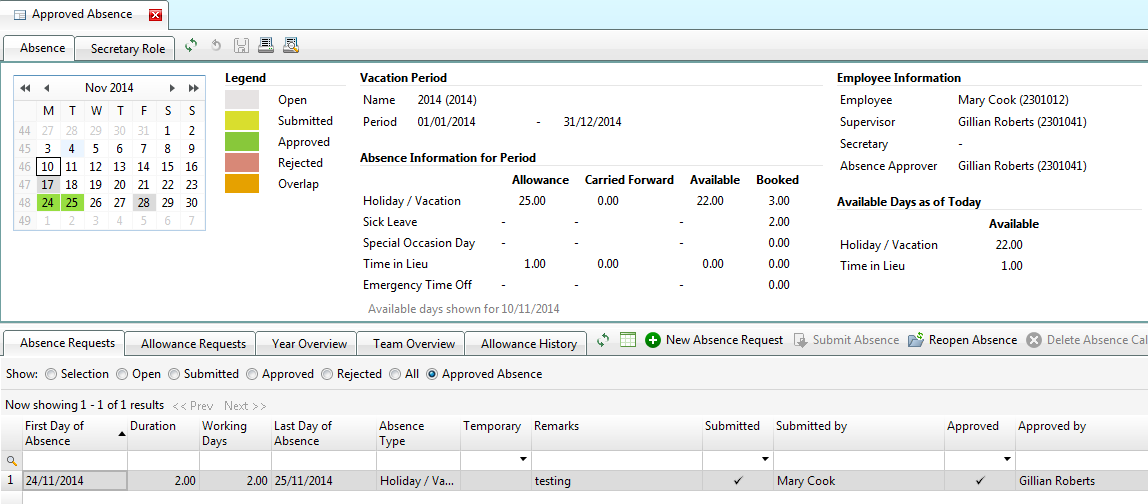
Please note that by approving the absence request, the automated entry appears on the timesheet for the duration of the leave. This record cannot be edited directly on the timesheet.
Once approved, the employee’s absence overview will be updated to reflect this approval.
If you want to reject the absence request, press on the icon . The reason for the rejection must be filled in below popup window:
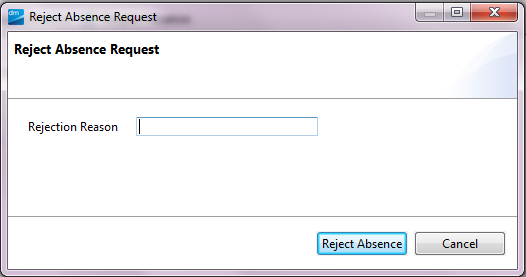
Press on the button  to trigger the notification being sent over to the individual who submitted their request.
Created with the Personal Edition of HelpNDoc: Single source CHM, PDF, DOC and HTML Help creation
Rejected Absence Request
When an absence request has been rejected, you will receive a To-Do ‘Rejected Absence Request’:
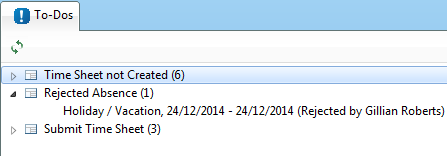
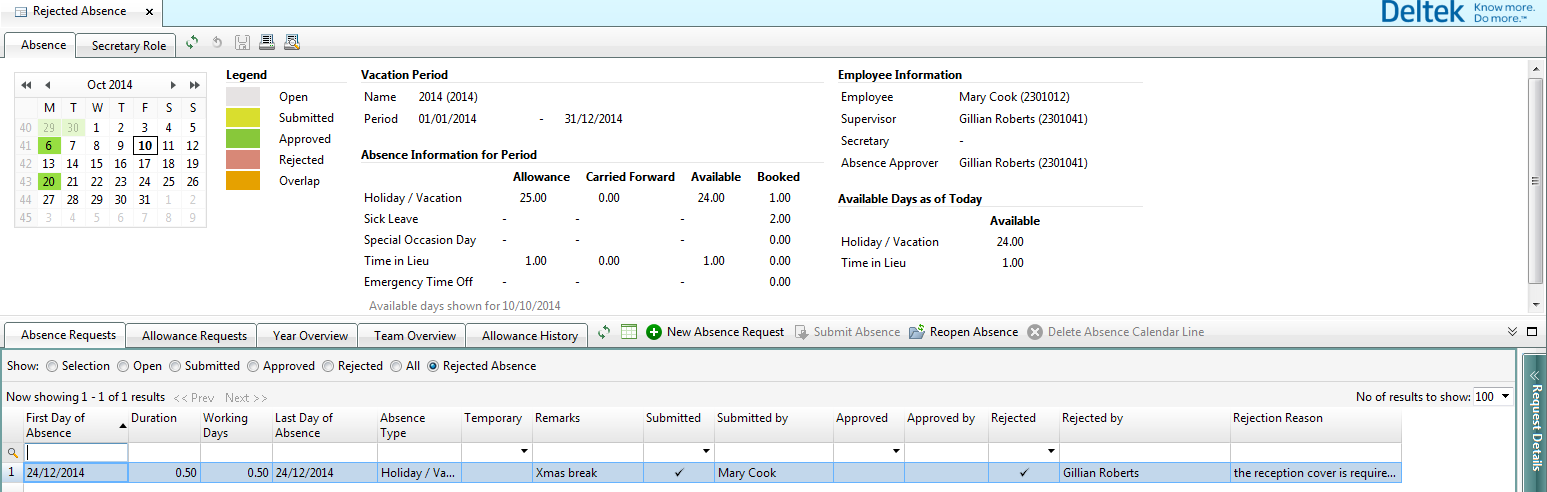
Double click on the To-Do. The Workspace will open with your absence request details, the reason for the rejection can be find under ‘Rejection Reason’ or under Request Details sliding panel.
You can re-open your request, make some alterations and submit it once again for the farther approval.
Created with the Personal Edition of HelpNDoc: Single source CHM, PDF, DOC and HTML Help creation
Absence Overview
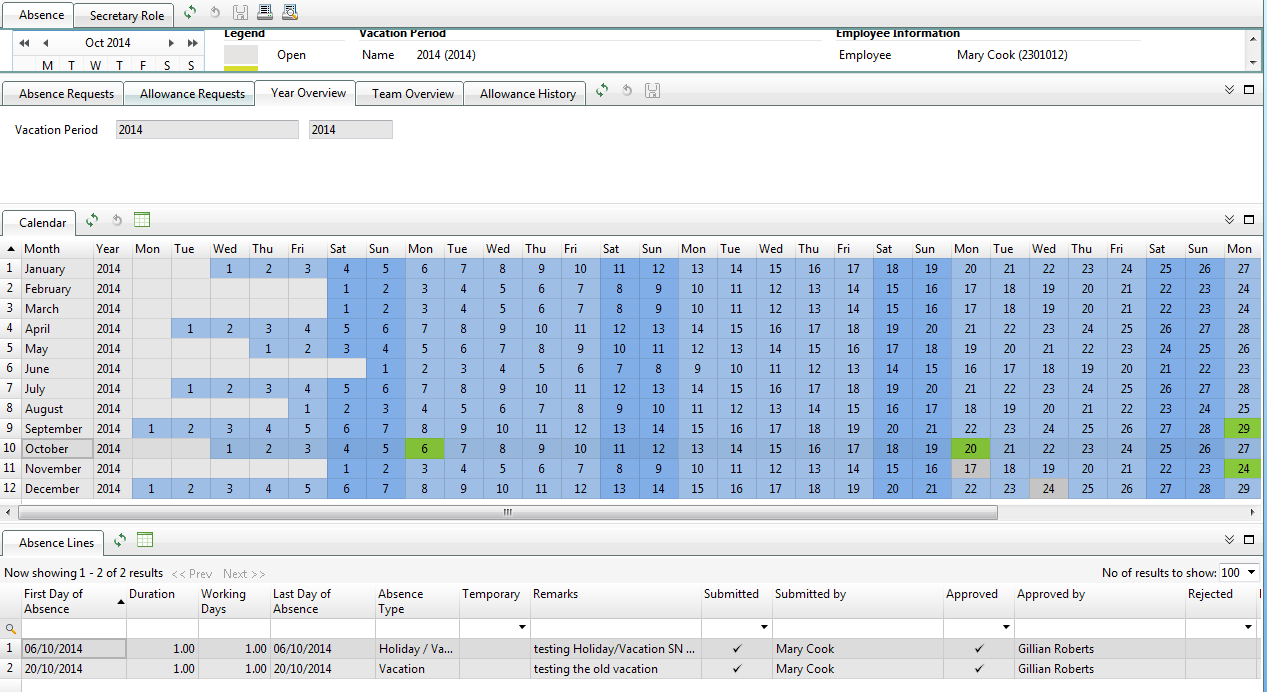
If you want to review and absence booked during the holiday year, go to the tab Year Overview, the Absence Lines will display the detailed entries.
You might the access to view the absence booking made by your team members so that your time off doesn’t overlap and you are preventing from getting your absence request rejected. Go to the tab Team Overview, specify the month and your team and press ENTER, the Calendar below will display any bookings made by your team members including the open requests:
Created with the Personal Edition of HelpNDoc: Easily create EBooks
Submitting Time in Lieu Request
In case you have worked overtime and you are allowed to take some time off in the near future, you need to follow process of requesting the absence allowance first and then requesting the absence under ‘Time in Lieu’.
In order to create a new allowance request got to Absence workspace and ensure you are under Allowance Request tab, press on the button 
The below wizard will get opened:
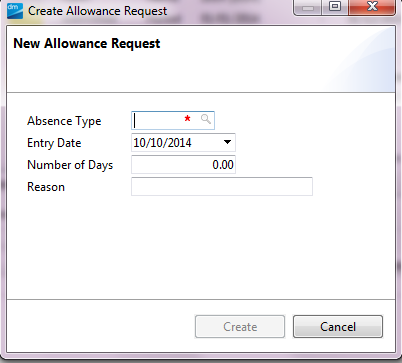
In the popup window enter ‘Time in Lieu’ under Absence Type. You can search for it by using the magnifying symbol  or start typing the name.
Entry Date should refer to the day when you have worked overtime.
Enter the Number of Days you are allowed to claim for the overtime e.g. 1 for the full day, 0.5 for a half a day,
Reason is needed to justify why extra days have being requested. This is used to determine the approval or rejection of the request.
Press on the ‘Create’ button to finalise this allowance request. Your request has been created and can be found under ‘Open’ allowance requests. Please review the details and follow with the submission by clicking the button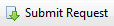 . This will send a To-Do to the Absence Approver to review and approve your allowance request.
Created with the Personal Edition of HelpNDoc: Free EBook and documentation generator
Allowance Request Approval
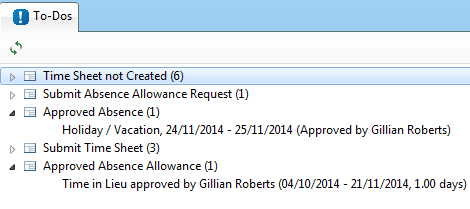
Once the allowance request has been submitted, the absence approver will get a To-Do to action on. This To-Do is shown in the Notifications area at the left bottom corner. The To-Do is called ‘Approve Absence Allowance’
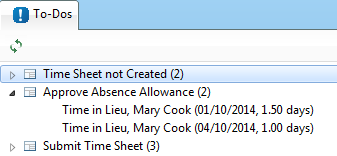
Open the approval by clicking on the name of the To-Do. This will open the workspace where the absence approver can review the request and decide on approving or rejecting it.
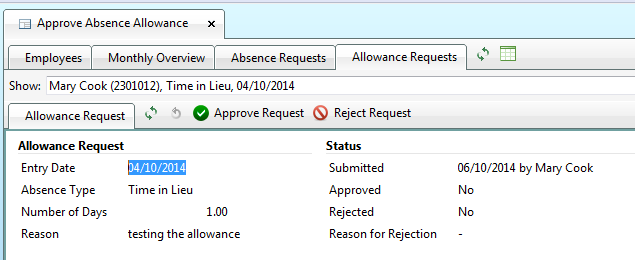
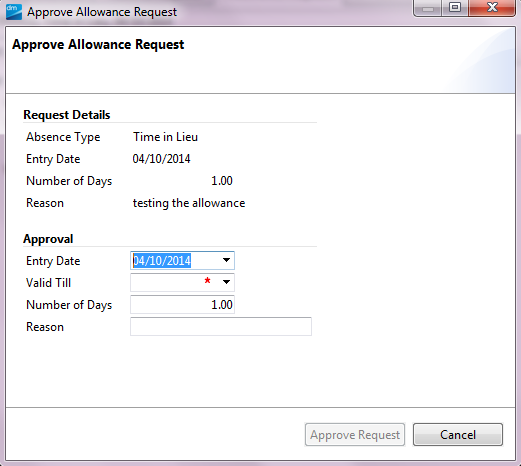
Review the request and press on the icon  to approve the absence allowance. Fill in the Valid Till in the popup window as well as provide a short justification:
By pressing the button the new To-Do will be sent to the individual who generated this request.
Please note that by approving the allowance request, the employee absence information will be updated accordingly.
The employee can use this allowance to request the time in lieu following the same steps as per any other absence request. This allowance must be taken within the validity period agreed by the absence approver.
If you want to reject the allowance request, press on the icon . The reason for the rejection must be provided in below popup window:
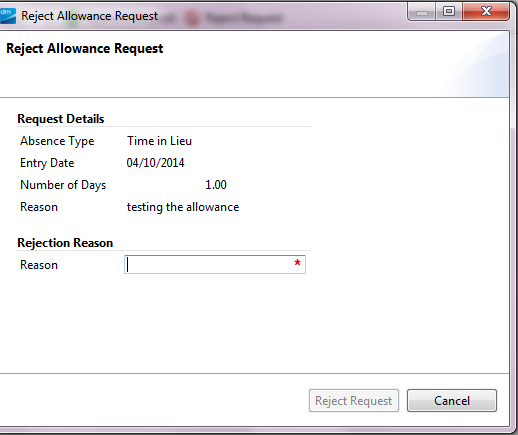
Press on the button  to trigger the notification being sent over to the individual who submitted their allowance request.
Created with the Personal Edition of HelpNDoc: Full-featured Documentation generator
Purchase Orders
All costs which need to be purchased will be registered in Maconomy using the Purchase Orders module. When all purchases are entered in Maconomy, the Project manager, the department manager as well as finance and general management will have a good understanding of all commitments and have a correct overview of how the project, department and business goes.
In the Workspace group Time & Expenses open the Menu item Purchase Orders. The workspace Purchase Orders will open and a list of all purchase orders is shown.
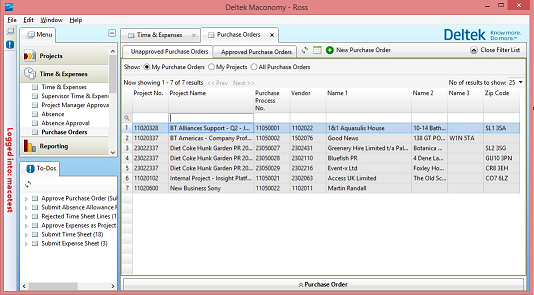
The Purchase Order module is opened. Here the screen is divided into 3 parts:
- List of Purchase Orders (Unapproved and Approved Tabs)
- Purchase Order Header
- Purchase order allocation lines
Created with the Personal Edition of HelpNDoc: Full-featured multi-format Help generator
Entering a Purchase Order
Entering a Purchase Order
- Start the New Purchase Order Wizard by clicking on the Button
The following wizard will open:
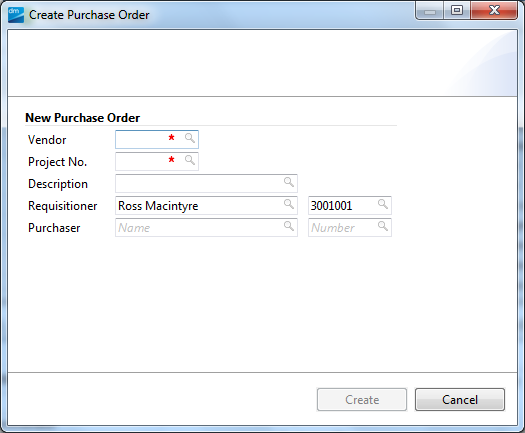
Fill out the fields in this Window. The fields with a red asterisk are mandatory fields. These must be filled otherwise you cannot proceed.
- Vendor:
Enter a vendor by typing the name of the vendor in the field. Optional you can click on the magnifying glass to search for the right vendor. Select your vendor By double clicking on the vendor.
- Project No.:
Enter the Project number to which the Purchase Order will be booked. For internal costs there are separate internal projects. Please inform at the finance team which project to use.
- Description:
Enter a brief description on what the purchase consists of.
- Requisitioner:
The Requisitioner is prefilled with your Employee name and number. This is the person who initiated the purchase.
- Purchaser (optional):
The Purchaser can be entered using the search functionalities. This is the person responsible for the purchase.
Press the ![]() button to complete the Wizard. You’ll return to the initial screen and the purchase order has been created.
button to complete the Wizard. You’ll return to the initial screen and the purchase order has been created.
Go to the allocation tab to enter the Purchase Order lines. Please note that these lines will eventually be copied to the vendor invoice, so fill out all the relevant information to ease the process.

- Click on the ‘Add Purchase Order Line’ button to enter a new line.
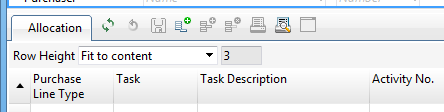
- Enter a Task by using the drop down in the task field.
- Fill in a description on what to purchase. This can also be a reference to a quote from the vendor.
- Enter the Quantity. In most cases this will be ‘1’.
- Enter a unit price. This is the price which has been agreed with the vendor
Once all lines have been entered, submit the Purchase Order using the ![]() button.
button.
Created with the Personal Edition of HelpNDoc: Create help files for the Qt Help Framework
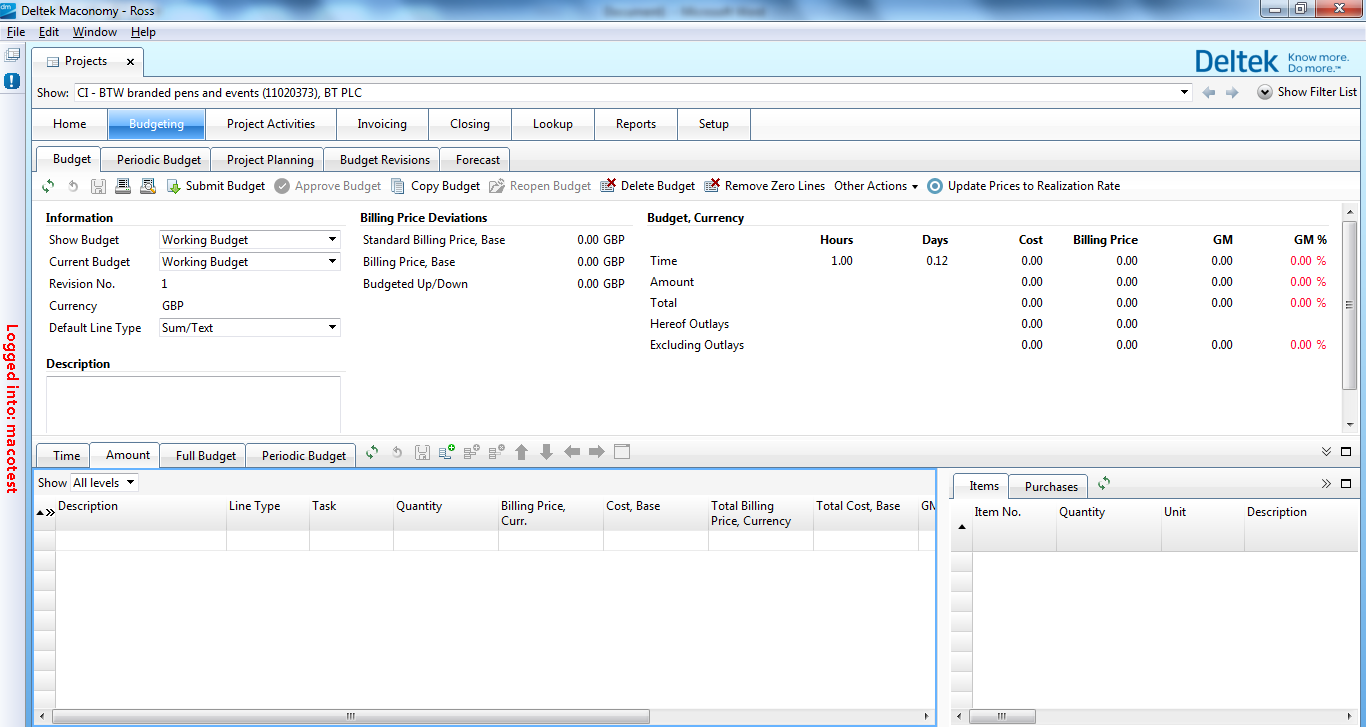
Create Purchase Order from the Project Activities Section
NOTE: This is only available for Project Managers
Open the Workspace group ‘Projects’ and select the first Menu item ‘Projects’
Select the project for which you want to create a purchase order.
Then select the Section ‘Project Activities’ and choose the tab Purchase Processes.
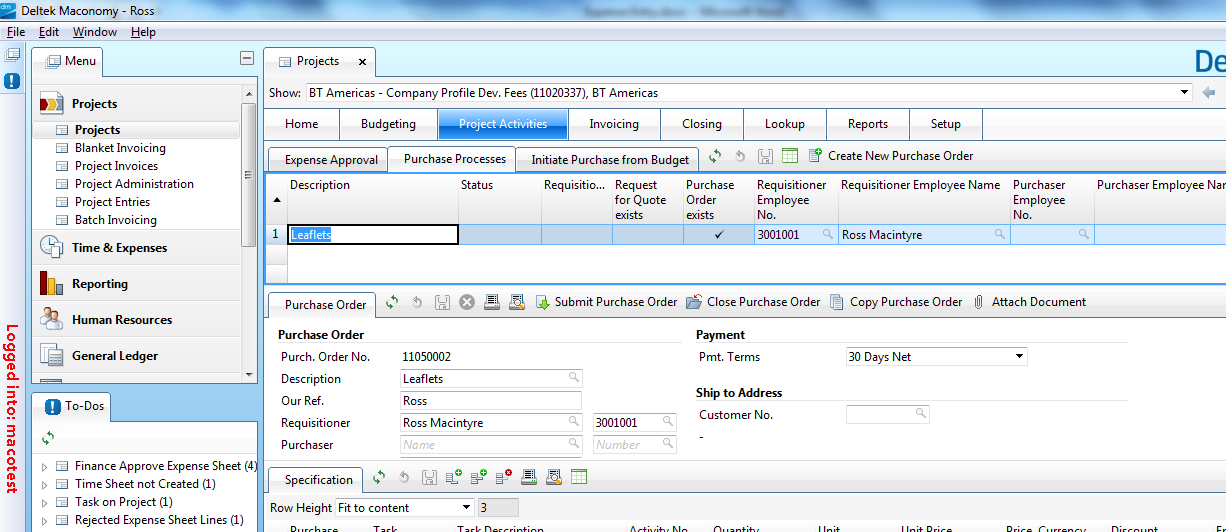
- Start the Purchase Order Wizard by clicking on the
 button.
 - The wizard is started. Note that fewer fields need to be entered, as many data is derived from the project.
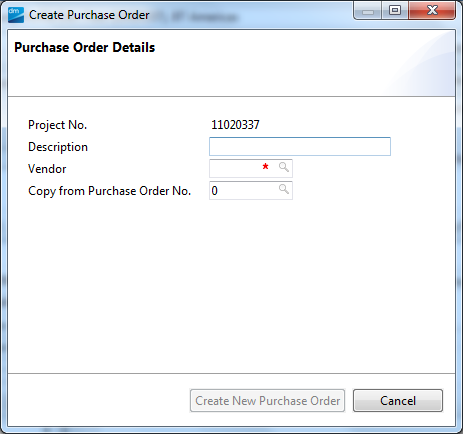
- Project No.:
This field is prefilled and cannot be changed
- Description:
Enter a brief description on what the purchase consists of.
- Vendor:
Enter a vendor by typing the name of the vendor in the field. Optional you can click on the magnifying glass to search for the right vendor. Select your vendor By double clicking on the vendor.
- Copy from Purchase Order No.:
In case you need to reorder a purchase or the purchase is almost similar to a previous entered purchase order, you can copy the allocation lines from another purchase order by entering the number here. The purchase order can be searched for using the magnifying glass.
When all fields are filled in correctly press the  button.
In case you chose to copy from an existing Purchase Order, the lines have been copied to your Purchase order. You can now edit the lines for your new purchase order.
When you have not chosen to copy from a purchase order, go to the purchase order lines and click on the ‘Add New Purchase Order Line’ button.
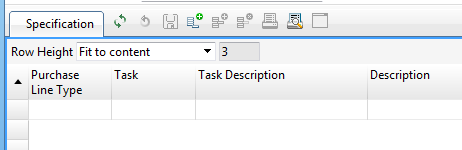
- Enter a Task by using the drop down in the task field.
- Fill in a description on what to purchase. This can also be a reference to a quote from the vendor.
- Enter the Quantity. In most cases this will be ‘1’.
- Enter a unit price. This is the price which has been agreed with the vendor
Once all lines have been entered, submit the Purchase Order using the ![]() button.
button.
Created with the Personal Edition of HelpNDoc: Full-featured multi-format Help generator
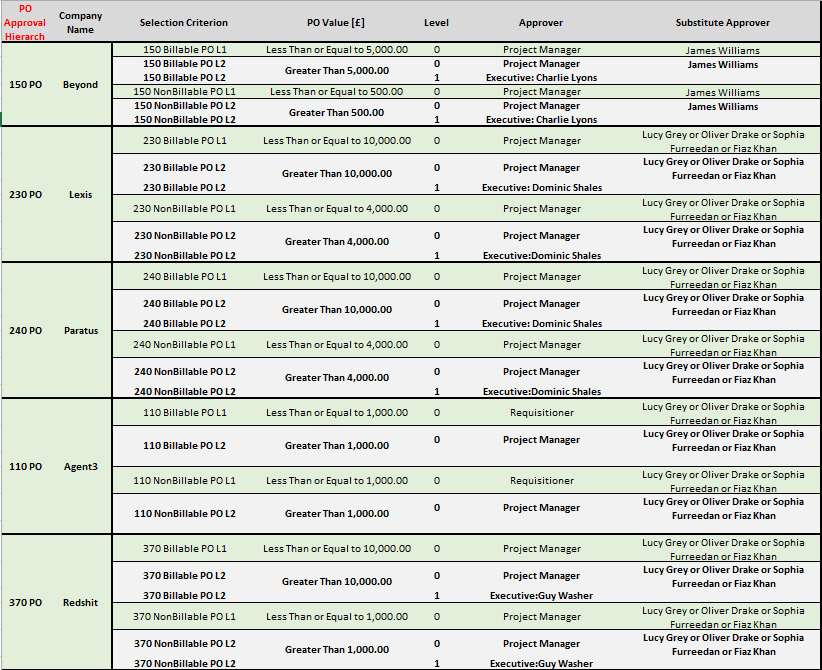
Approval Hierachy
All purchase will now go into the Approval Hierarchy. According to a pre-set list each purchase order must be approved according to the following table.
Created with the Personal Edition of HelpNDoc: Produce online help for Qt applications
Printing the Purchase order
Printing the Purchase order
Once the purchase order has been approved, it can be printed so it can be sent to the vendor.
In the Purchase Order workspace, select the 'Approved Purchase Orders' tab.
Select your purchase order from the list
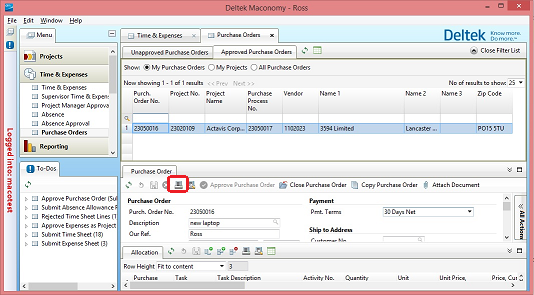
- Print the Purchase order using the print button
 .
.
- You can sent the Purchase order as an attachment in PDF format, or physically print the order on paper and Fax it or sent it by post.
Created with the Personal Edition of HelpNDoc: Free CHM Help documentation generator
People Planner
People Planner
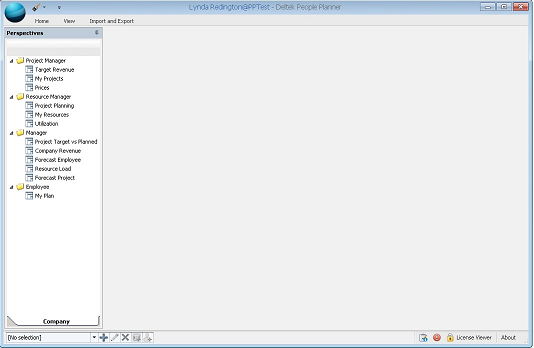
For all resource planning in Maconomy, a product called People Planner is used.
This integrates into Maconomy so that Projects, People and Absences are synchronised between both applications.
Once planned hours are entered, this can be incorporated in the standard reports out of Maconomy.
Created with the Personal Edition of HelpNDoc: Free Qt Help documentation generator
Connecting to People Planner
Connecting to People Planner
People Planner is an application which runs off the Next 15 servers. It is not available through the internet as with Maconomy so you will need a seperate username and password.
In order to get a username and password to people planner, please email the helpdesk@next15.com
One you have received these, you will also get an Citrix link which you will use to connect.
Created with the Personal Edition of HelpNDoc: Full-featured multi-format Help generator
Adding Target Revenue
Adding Target Revenue
The first step in the planning process is to enter the amount of revenue you are planning on recognising for the month.
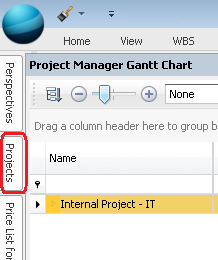
Select Target Revenue from the Project Manager perspective
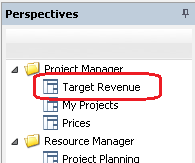
Click on the highlight arrow in the image below to get a list of projects

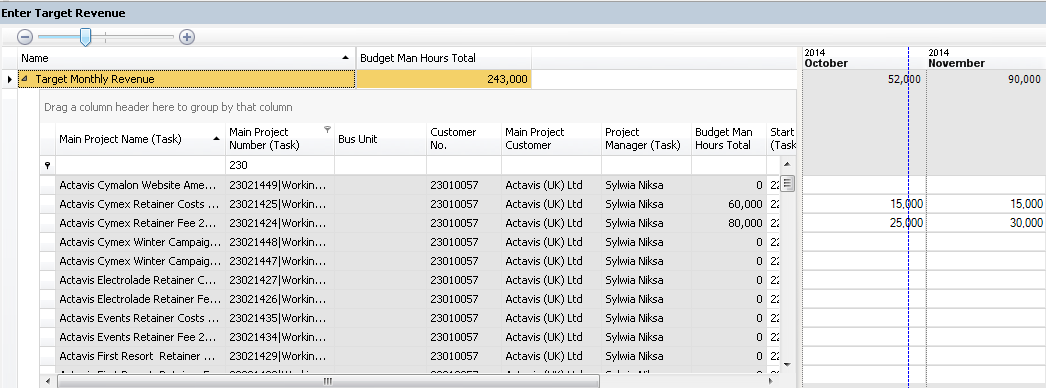
Entering Target Revenue, is just about clicking in the month against the project, and entering the amount in local currency (irrespective of the currency you bill the project in, you will need to enter the revenue in local currency)
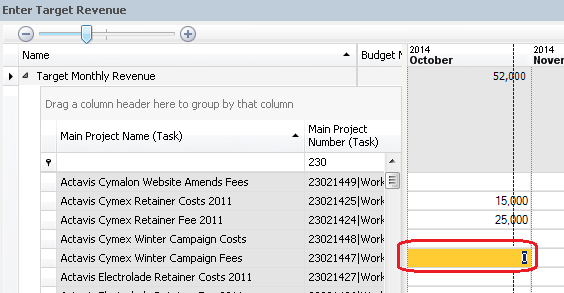
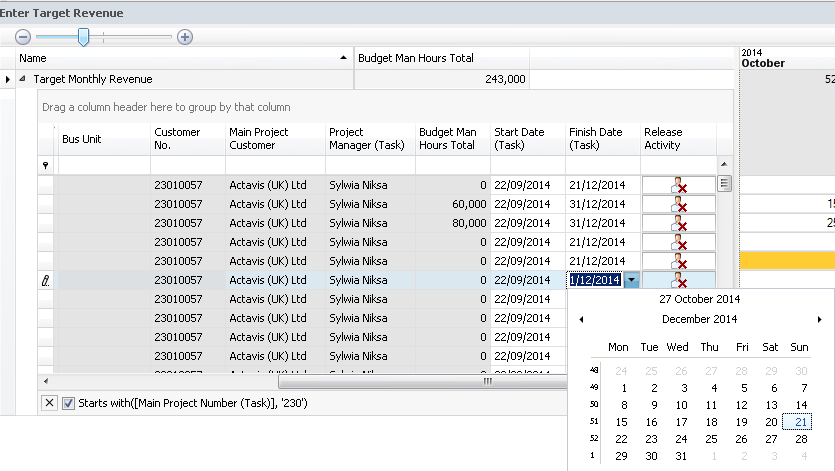
If you are unable to enter revenue as the column is greyed out, you will need to amend the finish date of the project.
To do this, scroll to the right and in the column Finish date, change the date to sometime in the future
Created with the Personal Edition of HelpNDoc: Easily create EBooks
Planning Hours
Entering Planned Hours
Entering Planned Hours is done of a project by project basis
Select My Projects from the Project manager perspective
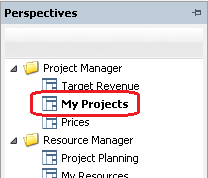
Select the Project from the list (You can use the filter to narrow down the list)

Created with the Personal Edition of HelpNDoc: Easily create PDF Help documents
Touch
Maconomy Touch
TOUCH FOR MACONOMY
Deltek Touch for Maconomy is the application which run on iPhone and Android applications.
At the moment, Touch will allow the enter of time and approval of time, expenses and purchase orders on your phone
INSTALL TOUCH
In either Apple’s App Store or Google’s Google play, search for “Deltek Touch for Maconomy” and install onto your phone.
INITIAL SETUP
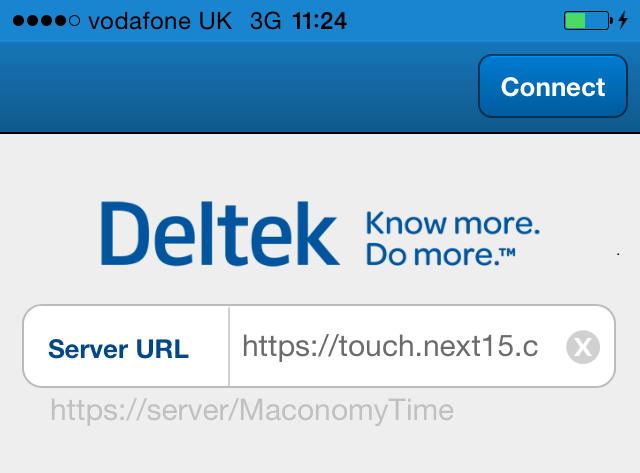
Enter https://touch.next15.com – LIVE environment https://touchtest.next15.com – TEST environment and press Connect |
|
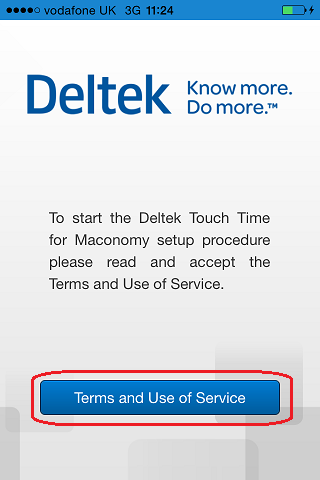
Click on “Terms and Use of Service” |
|
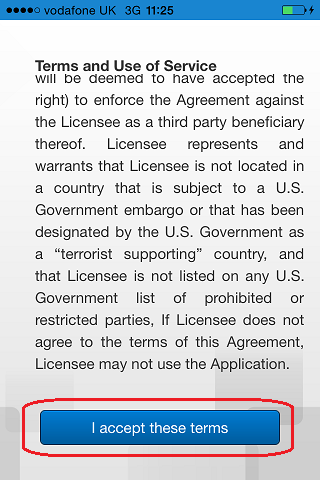
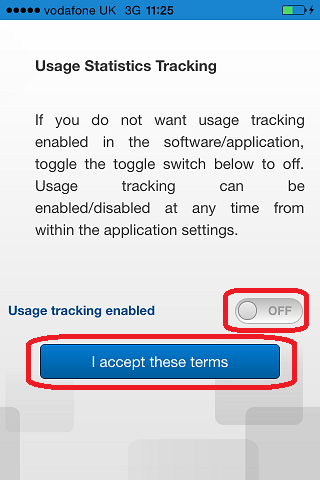
Scroll to the bottom and Click on “I accept these terms” |
|
Usage Statistics Tracking Turn this option off and then click on “I accept these terms” |
|
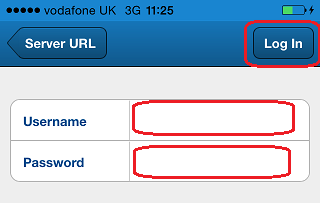
Enter your Maconomy username and password (both are case sensitive) and then press “Log In” |
|
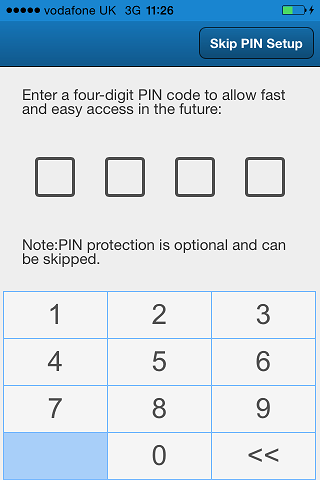
You will be asked to enter a 4 digit pin which will mean quicker connections in future (i.e. you will not need to keep entering your password) Once you enter, you will be asked to confirm |
|
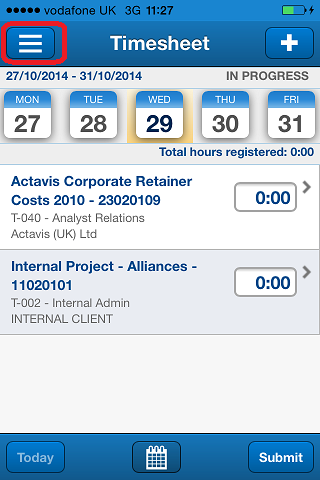
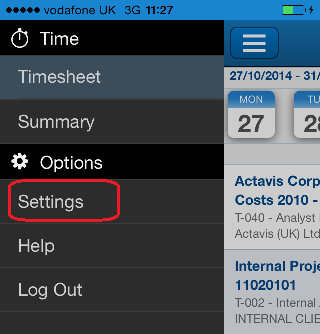
You will be taken to the Timesheet screen by default. Enable Approvals on the application, by clicking on the menu |
|
Then select the Settings option |
|
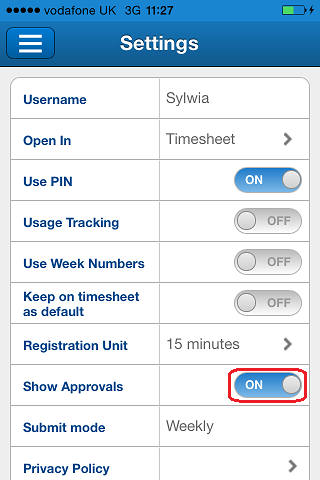
Against Show Approvals, set it to On |
|
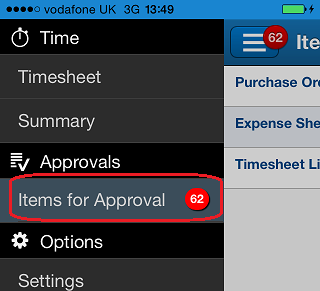
You will now have an extra item in your menu showing items to approve |

Created with the Personal Edition of HelpNDoc: Free CHM Help documentation generator
Time Entry
Maconomy Touch - Time Entry
SELECT WEEK / DAY
Click on the ![]() or
or ![]() to move between weeks or click on the calendar
to move between weeks or click on the calendar ![]() button and choose the week
button and choose the week
ADD A TIME LINE
|
|
COPY A TIMELINE
To copy a time line, touch and hold the line until options display, then tap Copy Line 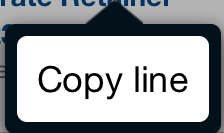
DELETE A TIMELINE
To delete a time line, swipe across the line you want to delete and press Delete button.
Choose to either delete the entire line or just the hours on the selected day
UPDATE A TIMELINE
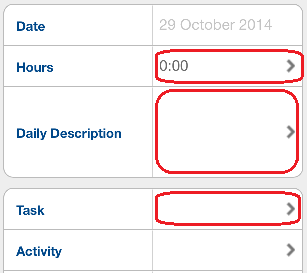
Tap on the timeline, you can then change the Task, description and hours
SUBMIT TIME FOR APPROVAL
Once time for the week has been submitted, you can submit the time for approval by clicking on the Submit button
CHECK TIMESHEET STATUS
The status of a selected timesheet and time period displays on Weeks (below start and end dates), Timesheet (same line as the start and end dates), and Calendar (dates use a color coding scheme). It determines which processing options are available to you.
▪ New – Timesheets that have not yet been created.
▪ In Progress – Timesheets that are not due and have not yet been submitted.
▪ Due – Timesheets that are due but have not yet been submitted.
▪ Submitted – Timesheets that have been submitted but not yet approved.
▪ Approved – Timesheets that have been submitted and approved.
▪ Fully Approved ‒ Timesheets that have been approved by all users who need to approve them.
▪ Rejected ‒ Timesheets that have been submitted but rejected by an approver.
CREATE/DELETE A FAVORITE (TIMESHEETS)
When you create a favorite from a timesheet line, the application can also copy the remark from the timesheet line to the favorite.
1. Go to the timesheet period that you want to update by tapping a period on Weeks on Calendar.
2. On Timesheet, swipe the date carousel to select a date, or tap the date. You can also select a date from another period by tapping the previous or next button at either end of the date carousel.
3. Tap ![]() .
.
4. Verify that Find Project displays All.
5. Scroll through the list or enter a name, number, or client in the search field. If the project is not included in the list, tap Continue Search on Server to search all of Maconomy.
6. Tap a project. You can also select a task, which Deltek Touch saves as part of Favorites.
7. In Create Favorite, toggle the switch to ON.
8. Tap Done.
9. On the Create Favorite popup window, you can accept or change the default favorite name. Tap OK.
10. To delete any projects added to Favorites. Tap a project. Tap Delete Favorite, and tap Yes to confirm.
VIEW PERIOD SUMMARY (TIMESHEETS)
1. Go to the timesheet period that you want to view by tapping a period on Weeks on Calendar.
2. On Timesheet, swipe the date carousel to select a date. You can also select a date from another period by tapping the previous or next button at either end of the date carousel.
3. Tap  , and tap Summary.
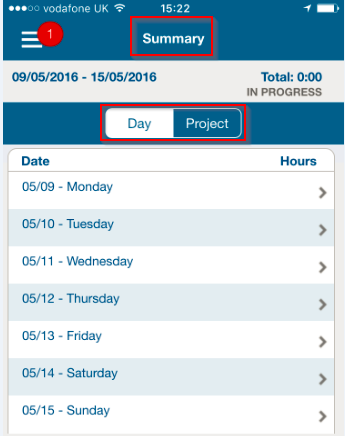
4. Tap Day or Project to view the summarized information by day or project. Tapping a day in Day view opens the corresponding day for the current timesheet period on Timesheet.
REVIEW A REJECTED TIMESHEET OR TIMESHEET LINE
- Tap
 , and tap Rejected.
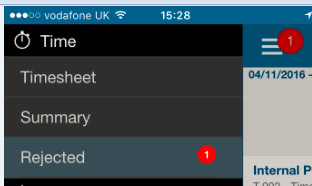
- On Rejected Timesheets, scroll through the list and tap the timesheet or timesheet line that you need to review.
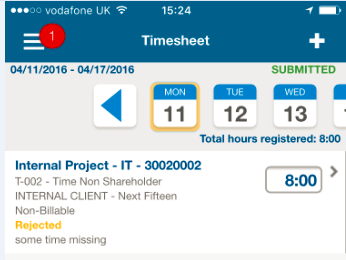
3. Update the timesheet or timesheet line, and tap Done.
4. When ask to continue, tap Yes.
Created with the Personal Edition of HelpNDoc: Create help files for the Qt Help Framework
Expenses
Maconomy Touch - Expense Entry
VIEW THE EXPENSE SHEET LIST / DETAILS
1. Tap  , and tap Expense Sheet, click on Open or All option.
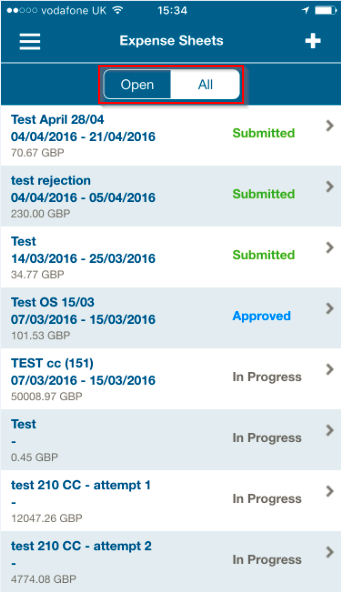
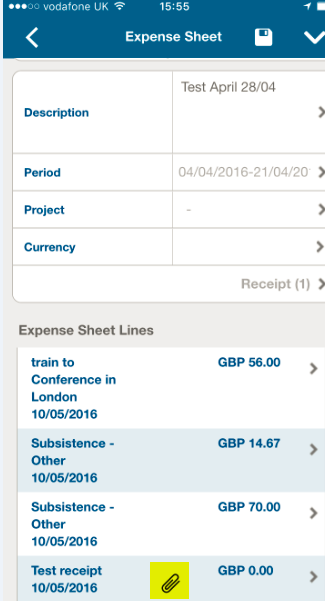
2. On Expense Sheets, scroll through the list to view expense sheets, which are sorted descending with most recent at the top. Tap an expense sheet to view details.
ADD AN EXPENSE SHEET
1. Tap  , and tap Expense Sheet.
2. On Expense Sheets, tap  .
.
3. On Expense Sheet, enter or select necessary details, Description, Period (optional, start and end of your receipts), Project, Currency (if receipts are different from your based Currency) and tap  to save.

COPY/ADD/SUBMIT/DELETE AN EXPENSE SHEET and ATTACH RECEIPT
1. Tap  , and tap Expense Sheet
2. On Expense Sheets, you can take the following actions when tapped  :
:
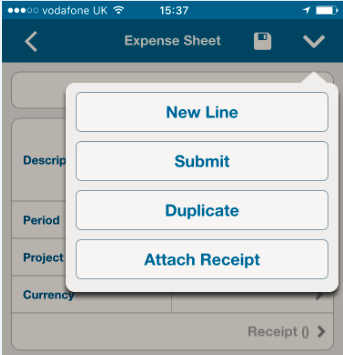
- Tap New Line – to create multiple lines on Expense sheet
- Tap Duplicate – to copy an entire Expense sheet.
- Tap Submit – use this option to submit for approval only when all lines are created, updated with projects, tasks, descriptions and all receipts are attached.
- Tap Attach Receipt - to attach a copy of receipts. Two options are available when clicked on

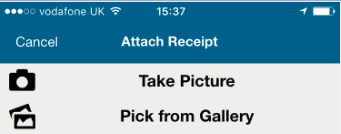
USING QUICK CAPTURE
1. Tap  , and tap Quick Capture.
2. Tap your device’s default camera button, and tap OK. Tap Retry if you want to discard the previous photo and capture a new one.
3. On Attach Receipt, enter a receipt name, and tap the expense sheet to which you want it to attach. You can also create a new expense sheet by tapping  Create New. Tap Done.
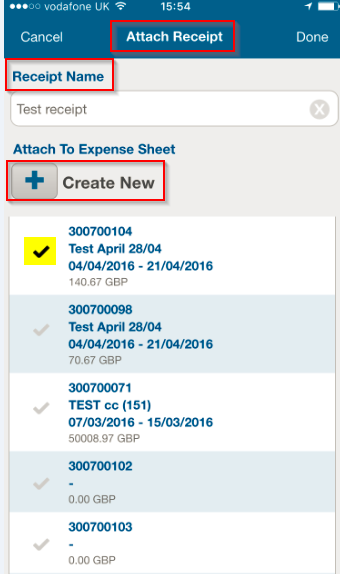
- The newly created expense sheet name displays and is automatically selected in the list.
5. On Expense Sheet, enter or tap necessary details, and tap  to save.
DELETE A RECEIPT
1. Tap  , and tap Expense Sheet.
2. On Expense Sheets, scroll through the list to select an expense sheet.
3. Tap the expense sheet that you want to update.
4. On Expense Sheet, tap the expense sheet line with the attached receipt you want to delete.

5. On Expense Sheet Line, tap Receipt.
6. Tap Delete.
Created with the Personal Edition of HelpNDoc: Easily create HTML Help documents
Approvals
Maconomy Touch - Approvals
As a Project Manager, you will be able to approve :
- Timesheets
- Expenses
- Purchase Orders
If you have any items to approve, a badge will appear ![]() . Tap on this icon and select Items for Approval.
. Tap on this icon and select Items for Approval.
TO APPROVE TIMESHEET LINES
- On the Timesheet Line Approval, select the project you want to review
- You can either :
- Tap Select all, then tap
 button and select Approve, Undo Approve/Reject or Reject (if you Reject, you will be asked for a reason)
- Tap the individual timesheet line, to drill into the detail, and then tap
 button and select Approve, Undo Approve/Reject or Reject (if you Reject, you will be asked for a reason)
TO APPROVE EXPENSE SHEET LINES
- On the Expense Sheet Line Approval, select the project you want to review
- You can either :
- Tap Select all, then tap
 button and select Approve, Undo Approve/Reject or Reject (if you Reject, you will be asked for a reason)
- Tap the individual expense line, to drill into the detail, and then tap
 button and select Approve, Undo Approve/Reject or Reject (if you Reject, you will be asked for a reason)
TO APPROVE PURCHASE ORDERS
- On the Purchase Order Approval, select the purchase order you want to review
- Tap tap
 button and select Approve, Undo Approve/Reject or Reject (if you Reject, you will be asked for a reason)
Created with the Personal Edition of HelpNDoc: Free Kindle producer
Copyright © 2014 by Next 15 Communications Group plc. All Rights Reserved.